How to Create Professional Food Photography Lighting Using a Single Continuous Light and Kitchen Aluminum Foil
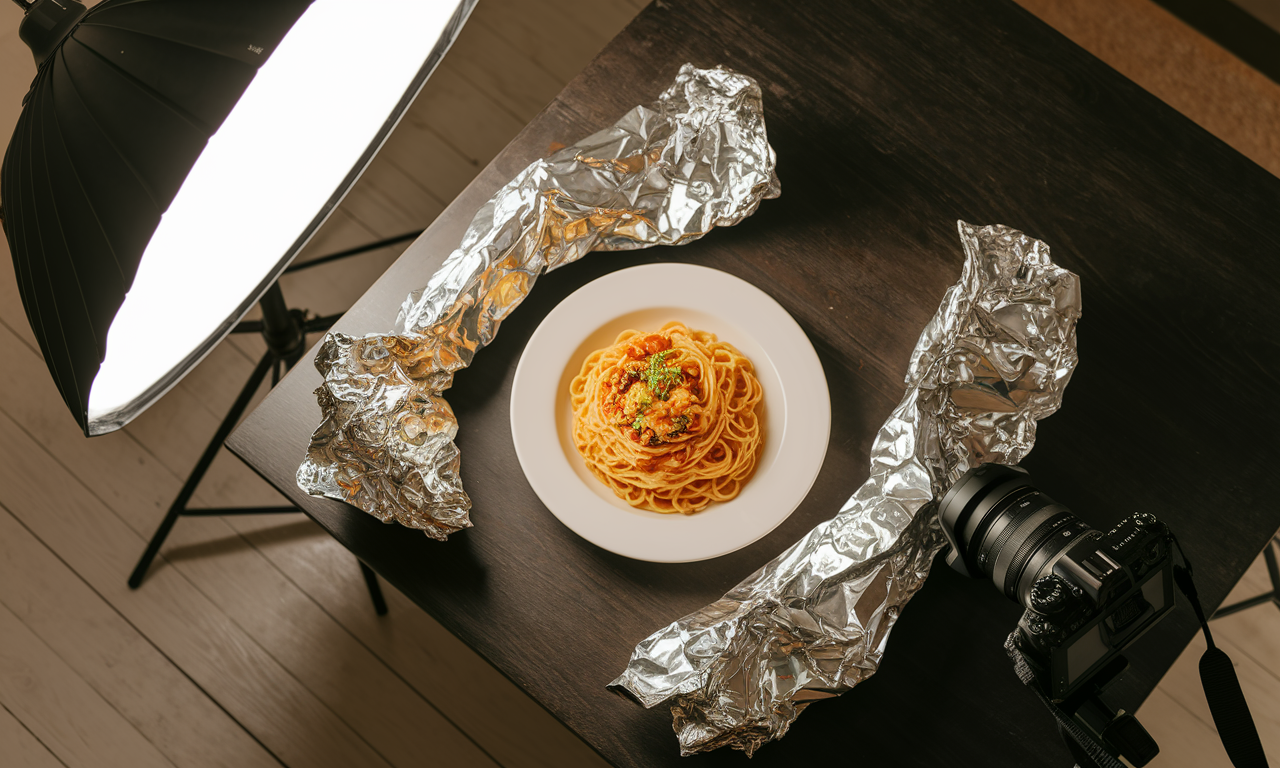
Creating stunning food photography doesn't require expensive equipment. You can achieve professional food photography lighting with just one continuous light and kitchen aluminum foil. This budget-friendly approach transforms your kitchen into a photo studio. Many photographers overlook these simple tools that deliver amazing results.
The key lies in understanding how light behaves with different surfaces. Aluminum foil acts as a powerful light modifier that shapes and directs illumination. This technique helps you control shadows and highlights without breaking your budget.
Professional food photographers use similar principles with expensive gear. The difference is knowing how to work with what you have. Your kitchen becomes the perfect laboratory for testing these lighting techniques.
Step-by-Step Guide
Essential Equipment Setup
Start by gathering your basic equipment for this continuous lighting setup. You need one continuous LED light, aluminum foil, and a sturdy surface. Position your light source at a 45-degree angle from your food subject.
Choose a consistent work area with minimal ambient light. Your kitchen counter works perfectly for most food photography sessions. Clear the space of distracting elements that might reflect unwanted light.
Test your camera settings before adding any light modifiers. Set ISO to 400, aperture to f/5.6, and adjust shutter speed accordingly. These baseline settings give you room to fine-tune your exposure.
Creating Your Aluminum Foil Reflectors
Tear off three sheets of aluminum foil, each about 18 inches long. Crumple one sheet lightly for soft, diffused reflection. Keep the second sheet smooth for hard, directional light.
Create different textures with your third sheet by partially crumpling it. This gives you a medium reflection that works well for most food subjects. Fold the edges to create stable, standing reflectors.
Position these photography reflectors around your subject using books or small boxes for support. The smooth foil creates strong highlights while crumpled foil produces gentle fill light.
Light Positioning and Direction
Place your continuous light at different angles to see how shadows fall. Side lighting creates dramatic texture that makes food look more appealing. Avoid placing the light directly above your subject.
Move the light closer to intensify brightness and farther away to soften it. The distance between your light and subject controls the contrast ratio. Closer placement creates more dramatic shadows.
Use your aluminum foil reflectors to bounce light into shadow areas. Position them opposite your main light source for balanced illumination. Adjust angles until you see the desired fill light effect.
Practical Applications
Kitchen Lighting Techniques for Different Food Types
Different foods require specific lighting approaches for optimal results. Glossy surfaces like sauces need soft, diffused light to avoid harsh reflections. Use crumpled foil reflectors to create gentle, even illumination.
Textured foods benefit from directional side lighting that emphasizes surface details. Position your continuous light at a low angle to create shadows. This technique works perfectly for bread, meat, and vegetables.
Transparent or translucent foods like drinks require backlighting for visual appeal. Place your light behind the subject with foil reflectors filling the front. This creates an attractive glow that showcases liquid clarity.
Camera Settings for Continuous Light
Continuous lights require specific camera adjustments compared to flash photography. Start with manual mode to maintain consistent exposure throughout your session. Set white balance to match your light temperature.
Use aperture priority when you need to adjust depth of field quickly. Most food photography works well between f/4 and f/8 for sharp focus. Higher f-stops require slower shutter speeds with continuous lighting.
Monitor your histogram to avoid blown highlights on shiny food surfaces. Aluminum foil can create bright spots that lose detail in post-processing. Adjust exposure compensation as needed to maintain detail.
Your artificial lighting setup adapts to any food photography challenge with practice. The key is understanding how light interacts with different textures and surfaces. Each session teaches you new techniques for future shoots.
Tips & Tricks
Maximizing Your Single Light Source
One continuous light can create multiple lighting patterns with strategic positioning. Move it in a circle around your subject to see different shadow patterns. Each position creates a unique mood and texture emphasis.
Vary the height of your light source to change shadow direction and length. High placement creates short shadows while low angles produce long, dramatic shadows. Medium height usually provides the most flattering results.
Use your light's intensity controls to fine-tune exposure without changing camera settings. This helps maintain your chosen depth of field and shutter speed. Many LED panels offer smooth dimming capabilities.
Advanced Foil Techniques
Create custom light shapers by forming foil into different configurations. Roll it into tubes for spot lighting effects. Fold it into V-shapes for directional bounce lighting.
Combine shiny and matte sides of foil for different reflection qualities. The shiny side produces harder light while the matte side creates softer fill. Mix both effects in the same setup for complex lighting.
Use colored gels or translucent materials behind your foil for creative effects. This technique adds subtle color casts or softens harsh reflections. Experiment with wax paper or shower curtains as diffusion materials.
Color Temperature and White Balance
Match your continuous light temperature to your camera's white balance setting. Most LED panels output daylight-balanced light around 5600K. Set your camera's white balance to daylight or use manual adjustment.
Aluminum foil doesn't change color temperature but can affect color intensity through reflection. Clean foil produces neutral reflections while aged foil may add warm tones. Keep this in mind when planning your shots.
Use custom white balance for the most accurate colors in your budget food photography. Take a reference shot of a white card under your lighting setup. This ensures consistent color reproduction across all images.
Sample Scenario
Photographing a Gourmet Burger
Let's walk through a complete food photography lighting session with a gourmet burger. Position your burger on a dark wooden board to create contrast. Place your continuous light at a 45-degree angle from the left side.
Set up one smooth foil reflector on the right side to fill shadows. Add a second crumpled foil reflector behind the burger for subtle backlighting. This creates depth and separates the subject from the background.
Start with camera settings of ISO 400, f/5.6, and 1/60 second shutter speed. Adjust based on your light intensity and desired depth of field. The sesame seeds should be sharp while the background falls off softly.
Adjusting for Different Results
Move your main light closer for more dramatic shadows and texture emphasis. This technique highlights the burger's layers and makes ingredients more distinct. The cheese and lettuce will show better texture definition.
Try positioning the light directly overhead for even illumination without harsh shadows. This approach works well for flat-lay compositions or when shooting multiple burgers. Use foil reflectors to prevent overly flat lighting.
Experiment with backlighting to create an appetizing glow around the burger's edges. Position your light behind and slightly above the subject. Use front-facing foil reflectors to maintain detail in the face of the burger.
Key Do's for Effective Usage
Essential Best Practices
- Always secure your foil reflectors with tape or clips to prevent movement
- Start with your main light at medium intensity and adjust gradually
- Take test shots frequently to check shadow placement and exposure
- Keep spare foil pieces ready for quick adjustments during shooting
- Use a tripod to maintain consistent framing while adjusting lighting
Maximizing Light Quality
- Clean your foil regularly to maintain reflective quality
- Position reflectors at different distances to vary light intensity
- Use multiple small foil pieces rather than one large sheet for precision
- Angle reflectors carefully to avoid unwanted glare or hot spots
- Test different foil textures to find your preferred reflection style
Camera and Technical Considerations
- Shoot in manual mode for consistent exposure control
- Use live view to see lighting effects in real-time
- Check your histogram frequently to avoid overexposure
- Focus carefully as continuous lights can create focusing challenges
- Take multiple shots with slight lighting variations
Common Mistakes to Avoid
Lighting Setup Errors
Never place your continuous light too close without checking for overheating issues. LED lights generate heat that can affect food appearance and safety. Maintain safe distances while achieving your desired lighting effect.
Avoid using wrinkled foil when you need clean, sharp reflections. Excessive creasing creates unpredictable light patterns that may ruin your shot. Keep some smooth foil pieces ready for crisp reflection work.
Don't ignore ambient light sources that can create color temperature conflicts. Turn off overhead kitchen lights or fluorescent fixtures that might contaminate your lighting. Work with one light source for consistent results.
Technical Photography Mistakes
Resist the urge to use high ISO settings unnecessarily with continuous lighting. Modern cameras handle higher ISOs well, but stay around 400-800 for best image quality. Adjust light distance and intensity instead of boosting ISO.
Don't forget to adjust white balance when switching between different continuous lights. Each light source has unique color characteristics that affect your final images. Take white balance references for each setup change.
Avoid using auto-focus in low light conditions created by dimmed continuous lights. Manual focus gives you precise control over sharp areas. Use your camera's magnification feature for accurate focusing on key food details.
Composition and Styling Issues
Never ignore how your lighting affects food styling and freshness. Continuous lights can dry out or wilt certain ingredients over time. Work quickly and keep backup ingredients ready for extended sessions.
Don't create overly complex lighting setups that become difficult to control. Start simple with one light and one reflector. Add complexity gradually as you master basic lighting control techniques.
Troubleshooting & FAQs
Solving Common Lighting Problems
Problem: My food looks flat and lacks dimension despite using reflectors.
Solution: Increase the distance between your main light and fill reflector. This creates more contrast between highlight and shadow areas. Also try positioning your main light at a steeper angle.
Problem: Unwanted reflections appear on glossy food surfaces.
Solution: Move your light source to a different angle or use crumpled foil for softer reflection. You can also position a large diffusion material between the light and subject.
Problem: Colors look wrong even with proper white balance.
Solution: Check for mixed lighting sources contaminating your setup. Cover windows or turn off other lights. Take a custom white balance reading under your specific lighting conditions.
Equipment and Setup Questions
Q: What's the minimum wattage needed for continuous LED lights?
A: A 20-30 watt LED panel provides sufficient light for most food photography needs. Higher wattage gives you more flexibility with camera settings and working distance.
Q: Can I use regular aluminum foil from any brand?
A: Yes, standard kitchen aluminum foil works perfectly for photography reflectors. Heavy-duty foil holds its shape better for repeated use during longer shooting sessions.
Q: How do I prevent camera shake with slower shutter speeds?
A: Always use a tripod with continuous lighting setups. Enable your camera's timer or use a remote shutter release. Some cameras offer vibration reduction that helps with handheld shots.
Advanced Technique Questions
Q: How do I create even lighting for overhead flat-lay shots?
A: Position your light directly overhead and surround your subject with foil reflectors on all sides. This creates wraparound lighting that minimizes shadows in flat-lay compositions.
Q: Can this setup work for video recording?
A: Absolutely! Continuous lights are perfect for video work since you see exactly how the lighting looks. Maintain consistent positioning throughout your recording session for uniform lighting.
Bringing It All Together
Mastering food photography lighting with simple tools opens creative doors without financial barriers. Your single continuous light and aluminum foil create professional results when used thoughtfully. These techniques form the foundation for more advanced lighting skills.
Practice with different food types to understand how light interacts with various textures and surfaces. Each shooting session teaches valuable lessons about light control and direction. Your kitchen becomes a training ground for professional techniques.
Remember that great food photography lighting comes from understanding light behavior, not expensive equipment. Master these basic principles before investing in costly professional gear. The skills you develop here translate directly to studio lighting systems.
The beauty of this approach lies in its accessibility and immediate results. Every photographer started with simple tools and techniques like these. Your dedication to learning and practicing determines your success more than your equipment budget ever will.