
Travel Photography Tips: Essential Guide to Better Photos
📝 Step-by-Step Guide: Travel Photography Tips
Introduction
This comprehensive set of travel photography tips will help you plan, shoot, and edit stronger images on the road. Whether you use a smartphone or a full-frame camera, these practical steps cover planning, travel photography gear, camera settings, composition techniques, golden hour strategy, packing checklist, and post-processing workflows. Read on to implement a reliable travel photography guide that produces consistent results.
Step 1 — Pre-Trip Planning: Research and Intent
Define your photographic story before you leave. Choose whether you prioritize landscapes, street scenes, architecture, portraits, or a mixed portfolio. Then use mapping tools and social platforms for reconnaissance. For example, Google Maps and Instagram geotags reveal vantage points, while Flickr and travel blogs show seasonal light and typical compositions. In addition, confirm local regulations like drone rules and portrait permissions to avoid surprises.
- Create a shot list for each location: wide establishing image, mid-range context, close-up detail, and a human element.
- Check weather and sunrise/sunset times to plan golden hour photography.
- Learn local customs and basic phrases to ask permission for portraits.
Step 2 — Pack Smart: Travel Photography Gear & Packing Checklist
Packing is balancing capability with weight. Prioritize versatile lenses and redundancy for critical items. For many trips, travel photography gear should include a reliable camera body, two lenses covering wide-to-tele ranges, and a compact tripod. Also pack extra batteries and multiple memory cards, and protect gear from moisture and dust.
- Camera body or capable smartphone with RAW capability.
- Wide-angle (16–35mm equiv.) and medium tele/prime (35–85mm equiv.). If limited, 24–70mm covers most needs.
- Travel tripod, extra batteries (2–3), multiple memory cards, and a charger or power bank.
- Circular polarizer, variable ND filter, microfiber cloths, rain cover, and portable backup drive.
Step 3 — Camera Settings Basics (and How to Choose Them)
Master the exposure triangle—aperture, shutter speed, and ISO—and select settings by scene type. For landscapes, choose narrow apertures for depth of field; for portraits, open aperture for subject separation; for street work, fast shutter speeds reduce motion blur. Shoot RAW for post-processing flexibility and use appropriate focus modes for static or moving subjects.
- Landscapes: f/8–f/16, ISO 100–200, tripod for long exposures.
- Street: shutter 1/200s+, aperture f/2.8–f/8, ISO 400–1600 depending on light.
- Portraits: aperture f/1.8–f/4, shutter 1/125–1/250s, focus on the eye.
- Night: tripod, long exposures (1s–30s), ISO 100–800 or higher with denoising.
Step 4 — Composition Techniques (How to See Like a Photographer)
Composition is a primary differentiator between ordinary and memorable images. Use classical rules and then break them intentionally. Apply the rule of thirds, leading lines, foreground interest, framing, symmetry, negative space, and varied perspectives to tell stronger visual stories.
- Rule of Thirds: place focal points along thirds for balanced frames.
- Leading Lines: use roads, shorelines, and fences to guide the eye.
- Foreground Interest: include foreground elements to add depth.
- Change Perspective: shoot low or high to create fresh compositions.
Step 5 — Golden Hour & Light Management
Golden hour produces warm, directional light and softer contrast. Plan to arrive early and scout the scene while light is soft. Use backlighting for rim light, side-light to reveal texture, and bracket exposures when dynamic range is large. In harsh midday sun, move subjects into open shade or use reflectors for fill.
Step 6 — Shooting: Techniques for Different Scenes
Adjust approach by scene: use a tripod for landscapes, a discreet prime for street photography, and a fast lens for portraits. For night shots, rely on long exposures and careful focus. For action and wildlife, increase shutter speed and use continuous AF tracking.
Step 7 — Backup & Workflow on the Road
Follow the 3-2-1 backup rule: three copies, two types of media, and one offsite. Offload cards every evening to a portable drive or laptop, and consider automated cloud backups. Organize folders by date and location, and add short metadata for captions later.
Step 8 — Post-Processing & Post-Trip Editing
Effective post-processing turns good captures into polished images. Cull aggressively, perform global corrections first, then refine with local adjustments. Use noise reduction and sharpening sparingly. Export web images in sRGB at appropriate resolutions, and archive originals in a wide-gamut color space if you plan to print.
📌 Practical Applications: Travel Photography Tips
1. Landscape & Nature Photography
When photographing landscapes, golden hour and blue hour deliver the best color and contrast. Use a wide-angle lens to capture sweeping vistas and include a foreground element to lead the eye. Employ a polarizer to deepen skies and an ND filter to smooth water. For high dynamic range scenes, bracket exposures and blend in post-processing.
2. City & Street Photography
Street photography rewards anticipation and discretion. Use a 35mm or 50mm equivalent prime for speed and a low profile. Tune settings to a shutter speed that freezes motion, and learn zone focusing to increase hit rate. Blue hour offers atmospheric cityscapes with a balance between artificial lights and sky color.
3. Portraits & Environmental Portraits
For portraits, use wide apertures for subject separation but remain mindful of the background. Golden hour softens skin tones and provides natural catchlights. Engage with your subjects, and respect cultural norms when photographing people in foreign locations.
4. Night & Low-Light Photography
Night scenes require stable support and deliberate exposure choices. For cityscapes, set aperture for sharpness (often f/5.6–f/11), use low ISO, and expose for highlights. For creative work, use longer shutter speeds to capture light trails or star motion.
5. Food and Travel Details
Close-ups and food shots benefit from shallow depth of field and side-light to reveal texture. Use a 50mm or macro lens and position items on clean backgrounds to avoid distractions. Add human context, such as hands, to elevate the story.
6. Wildlife & Action
For wildlife, maintain distance and ethical behavior. Use telephoto lenses and high shutter speeds, and use continuous autofocus and burst modes for action. Always prioritize safety for animals and people.
Each practical application above connects to the same core workflow: plan the shot, choose the correct camera settings, and control light. In addition, use the appropriate travel photography gear and post-processing techniques to finalize the image for publication or print.
💡 Tips & Tricks: Travel Photography Tips
- Use hyperfocal focus to maximize depth of field when shooting handheld landscapes.
- Rotate a polarizing filter to reduce reflections on water and deepen skies.
- Bracket exposures for high-dynamic-range scenes (sunrise over dark foregrounds) and blend in post-processing.
- Pan with moving subjects using a slower shutter (1/30–1/60s) to create motion-blur backgrounds and convey speed.
- For backlit portraits, expose for the subject and recover highlights in RAW to preserve skin detail.
- Use consistent presets or a small set of LUTs to maintain a cohesive travel portfolio.
- Capture reflections in puddles and windows for creative symmetry and depth.
- Increase exposure compensation (+1/3 to +1 stop) on snowy or beach scenes to avoid underexposure.
- For smartphones, lock exposure and focus (AE/AF lock) and use HDR mode for high dynamic range scenes.
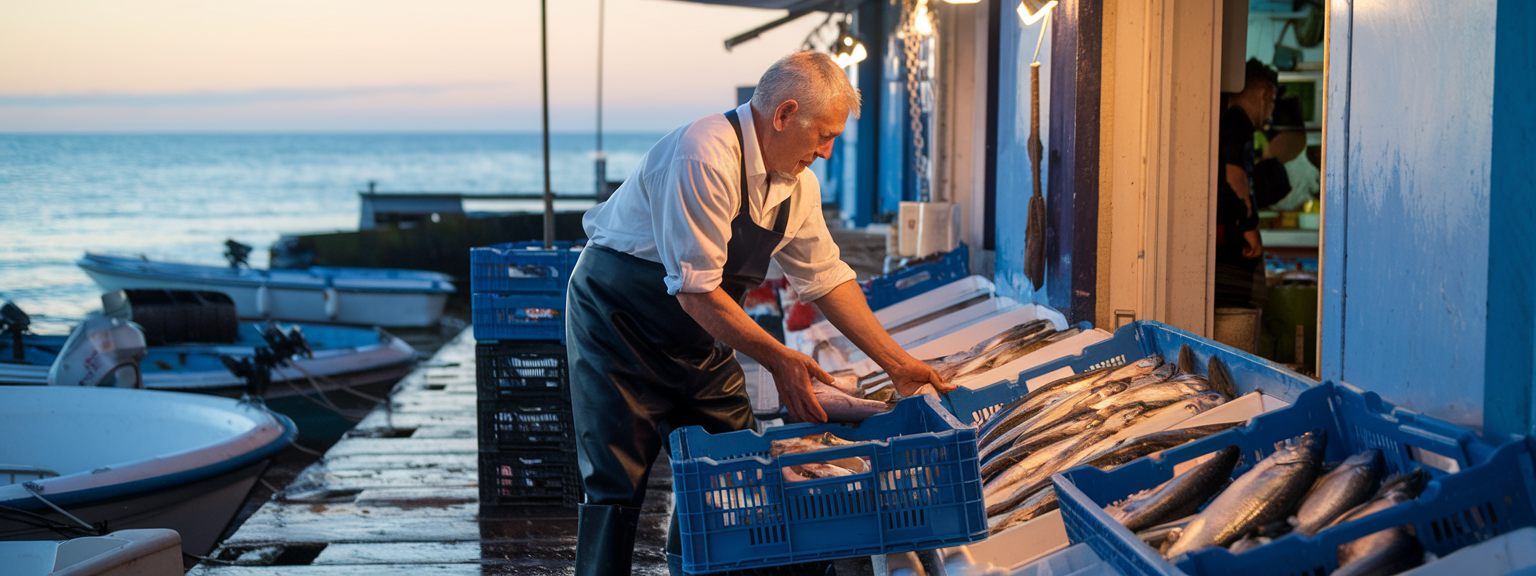
📸 Sample Scenario
Photographing a Coastal Market at Golden Hour — Walk-through
You arrive an hour before sunset at a coastal fish market. Your plan is to capture a set: an establishing shot, environmental portraits, texture details, and a dramatic sunset silhouette. Start by scouting vantage points. Then choose the right travel photography gear: a 24–70mm on the body plus a 50mm prime in the bag, and a tripod for sunset sequences.
- Establishing shot: f/8, ISO 200, 1/250s to freeze movement; use a polarizer to cut reflections off wet fish scales.
- Portraits: move close, use f/2.8–f/4 to separate subject from background; place subject off-center.
- Details: switch to 50mm or macro and use side-light to emphasize texture on fish and nets.
- Sunset silhouette: use tripod, meter for highlights, or bracket ±2 stops to blend an exposure that preserves foreground detail.
After shooting, offload cards to a portable drive and add brief metadata about locations and subject names to help captioning later. This simple workflow — plan, execute, back up — embodies the travel photography guide in practice.
✅ Key Do’s for Effective Usage
- Do plan but remain flexible; unplanned discoveries often create the best images.
- Do shoot RAW for maximum post-processing flexibility.
- Do invest in quality lenses rather than multiple camera bodies; lenses define look and sharpness.
- Do learn local etiquette and laws for portraits and drones.
- Do backup images daily using a 3-2-1 plan (local drive + cloud).
- Do keep a notebook or voice memo for context to improve captions and SEO later.
❌ Common Mistakes to Avoid
- Overpacking: choose versatile lenses and minimize body count to reduce fatigue.
- Shooting only in auto: you limit depth-of-field and motion control.
- Missing golden hour: arrive early and scout to avoid missing optimal light.
- Not backing up: lost cards and corrupted drives are avoidable with a consistent workflow.
- Overprocessing: avoid excessive HDR and saturation; aim for subtlety and realism.
🔄 Troubleshooting & FAQs
Troubleshooting Quick Fixes
Blurry images: increase shutter speed, stabilize with a tripod, and check focus mode. Underexposed shadows but clipped highlights: bracket exposures or use graduated ND filters; shoot RAW to maximize recovery. Noisy images: reduce ISO where possible and apply targeted noise reduction in post.
Frequently Asked Questions
Q: What are the best travel photography tips for beginners?
Start with one reliable kit, learn exposure basics, shoot RAW, focus on composition techniques, and practice golden hour shooting. Keep your workflow simple and back up daily.
Q: What camera settings are best for travel photography?
There is no single setting. Use f/8–f/16 and low ISO for landscapes, 1/200s+ for street, and f/1.8–f/4 for portraits. Use aperture or manual modes depending on control needs.
Q: Should I shoot RAW or JPEG when traveling?
RAW is recommended for flexibility during post-processing, especially in mixed lighting. If storage is limited, consider RAW+JPEG selectively for priority shoots.
Q: How do I pack and protect my travel photography gear?
Use a padded camera bag, rain cover, silica gel packets for humidity, and zip-lock bags on beaches. Keep gear insured and store backups separately from primary luggage.
Q: How can I improve my composition quickly?
Move your feet, change perspective, isolate subjects, and apply leading lines and foreground elements. Take multiple frames at different heights for variety.
Q: What are the best AI tools for productivity in photography?
Use Lightroom (Adobe Sensei) for auto-tagging and masking, Luminar Neo for sky replacement and quick adjustments, Topaz DeNoise AI for noise reduction, and automated backup solutions like Backblaze. These tools save time and enhance image quality when used responsibly.
Q: How do I keep photos organized while traveling?
Create dated folders, use Lightroom catalogs or Capture One sessions, apply consistent metadata, and back up daily. Add short captions to speed later selection and SEO-friendly captions.
🖼️ Bringing It All Together
Daily Travel Photography Workflow (Repeatable)
Morning: check weather and sunrise times, charge batteries, and format a spare card. Shoot: begin with an establishing shot, move to portraits and details, and finish with an experimental frame. Midday: cull while waiting and import to your laptop. Evening: golden hour and tripod scenes. Night: final backup and plan the next day’s locations.
Editing Workflow
Import and backup, cull to the best frames, apply global edits first (white balance, exposure, contrast), then local adjustments. Finally, export web-optimized JPEGs and archive high-resolution files for printing.
A consistent workflow, attention to light, and reliable travel photography gear will transform how you capture travel stories. Use these travel photography tips, refine your technique, and build a coherent editing style to showcase each trip with clarity and impact.
![[Studio portrait with dramatic lighting and color grading to demonstrate stunning images]](https://lenslesson.com/wp-content/uploads/2025/11/advanced-stunning-images-lighting-composition-editing.png "[Stunning Images Lighting And Editing]")


![[Portrait photographer adjusting softbox to achieve flattering portrait photography of a smiling subject]](https://lenslesson.com/wp-content/uploads/2025/11/portrait-photography-softbox-lighting-setup.png "[Portrait Photography Lighting Setup]")
![[Flat lay of essential photography gear: camera, lenses, tripod, and camera bag]](https://lenslesson.com/wp-content/uploads/2025/11/photography-gear-essentials-flatlay.png "[Essential Photography Gear Flat Lay]")
