
Street Photography Mastery: Tips, Techniques & Best Practices
📝 Step-by-Step Guide: Street Photography
Prepare: Gear, settings, and mental readiness
Street Photography begins with preparation. Choose a camera you can carry all day. A compact mirrorless body with a 35mm or 50mm prime is ideal because it balances discretion and versatility. In addition, pack a fast prime (f/1.4–f/2.8) for low-light street photography and a spare battery. For settings, start in Aperture Priority at f/5.6 for general scenes. For portraits or subject isolation use f/1.8–f/2.8. Set Auto ISO with a practical ceiling (for example ISO 6400) and a minimum shutter speed around 1/125s to avoid motion blur.
Choose your environment: planning urban photography shoots
Select locations that match your intent. For urban photography and candid street photography, markets, transit hubs, alleys, and cafés are reliable. Scout during different times of day. Golden hour yields softer shadows, while blue hour and neon-lit streets excel for low-light street photography. Weather changes the mood — rain produces reflections, and overcast skies soften light for portraits.
Positioning and approach: blending into the scene
Move deliberately and be unobtrusive. Sit at a café, use public furniture for cover, or walk with purpose so you look like you belong. For candid shots try shooting from the hip or waist level. For direct street portraits raise the camera to eye level and make brief, respectful contact. Anticipation and observation are key — pedestrians often repeat behaviors, so learn rhythm and timing to capture decisive moments.
Composition techniques: turn urban scenes into stories
Strong composition elevates technical competence into storytelling. Use the rule of thirds, leading lines, layering (foreground, middle ground, background), and natural frames such as doorways or reflections. For dramatic impact consider silhouettes against bright backgrounds or negative space to convey solitude. Color contrast also helps — pair a warm subject against cooler urban tones to draw the eye.
Timing and anticipation: capturing decisive moments
Timing defines street photography. Watch body language, micro-expressions, and the flow of people. Use burst mode for dynamic scenes but choose the single frame that communicates the narrative. As a result, you will gradually learn where to pre-focus and when to press the shutter for maximum impact.
Ethics and legality: candid photography responsibilities
Know local laws regarding photographing people in public. Generally, street photography is permitted in public spaces, but commercial use may require releases. Respect privacy and dignity. If a subject objects, apologize and offer to delete the image. For approached street portraits ask consent and offer to share the photograph.
Post-processing: enhance the story without betraying reality
Process with a light, consistent hand. Workflow: import, cull, adjust exposure and white balance, refine contrast, and apply selective edits sparingly. Convert to black and white when form and contrast are primary. Use noise reduction for high ISO images, and avoid heavy-handed HDR or clarity that sacrifices the authenticity of candid street photography.
📌 Practical Applications: Street Photography
Personal storytelling and travel
Street Photography is ideal for documenting culture and daily life during travel. Use candid photography to capture markets, street food, and transport scenes. For example, at a night market use a 35mm f/1.8, set shutter to 1/125s, and increase ISO to maintain detail on vendor hands and neon signage. This approach yields compelling environmental context and human detail.
Editorial and documentary work
For editorial assignments, produce a visual narrative. Combine wide environmental frames with intimate close-ups to tell a fuller story. Compose images with clear focal points and consistent tonality. Editorial clients prefer images that read quickly and convey context, therefore include recognizable urban scenes and actionable composition techniques.
Commercial uses: advertising & stock
Street-style imagery provides authenticity for lifestyle campaigns. For stock libraries, keep images generic: avoid logos and identifiable faces unless you have releases. Use positive body language and clear subject separation for broad commercial appeal. Moreover, collect both color and black-and-white versions to increase licensing opportunities.
Social media and portfolio growth
Sequence images to tell a story (wide → mid → close). Write captions that include location, camera settings, and a short anecdote to increase engagement. In addition, maintain a regular posting cadence to grow an audience and demonstrate consistency in your street photography practice.
Have you tried sequencing a 10-image street photography series that follows a single subject or route? Share the theme you would choose.
Street portraits and environmental portraits
When creating street portraits, combine ambient light with subtle fill light. Approach subjects respectfully and show examples of your work if you have them. For environmental portraits use wider lenses (28–35mm) to include setting. For tighter headshots use a 50–85mm to preserve flattering perspective while staying unobtrusive.
💡 Tips & Tricks: Street Photography
Mindset and approach
- Shoot daily to build instinct. Short, frequent sessions teach rhythm and timing.
- Limit your gear to one camera and one lens to streamline decisions and increase creativity.
- Embrace failure; many frames will be learning steps toward stronger images.
Technical tricks
- Zone focusing: pre-focus to a distance and shoot within that zone for instant candid captures.
- Back-button focus speeds reaction time and decouples focus from the shutter release.
- Use silent shutter when available; however, be aware of rolling shutter artifacts with fast movement.
- For motion blur panning, try 1/60–1/30s while tracking the subject to retain subject sharpness and blur the background.
Fast practice beats perfect gear — take one small walk today with only one lens and shoot 50 frames.
Lighting tricks
Use window light or doorways for flattering edge light. For low-light street photography rely on fast primes and raise ISO if necessary. Expose to the right when possible to minimize noise, then correct in RAW. For neon scenes, expose for skin tones and allow specular highlights to clip if necessary.
Composition tricks
Look for color anchors, shoot through objects, and use reflections to add narrative layers. Break patterns with a human subject to create tension and focus. In addition, keep backgrounds simple for portraits by using shallow DOF or repositioning your angle.
📸 Sample Scenario
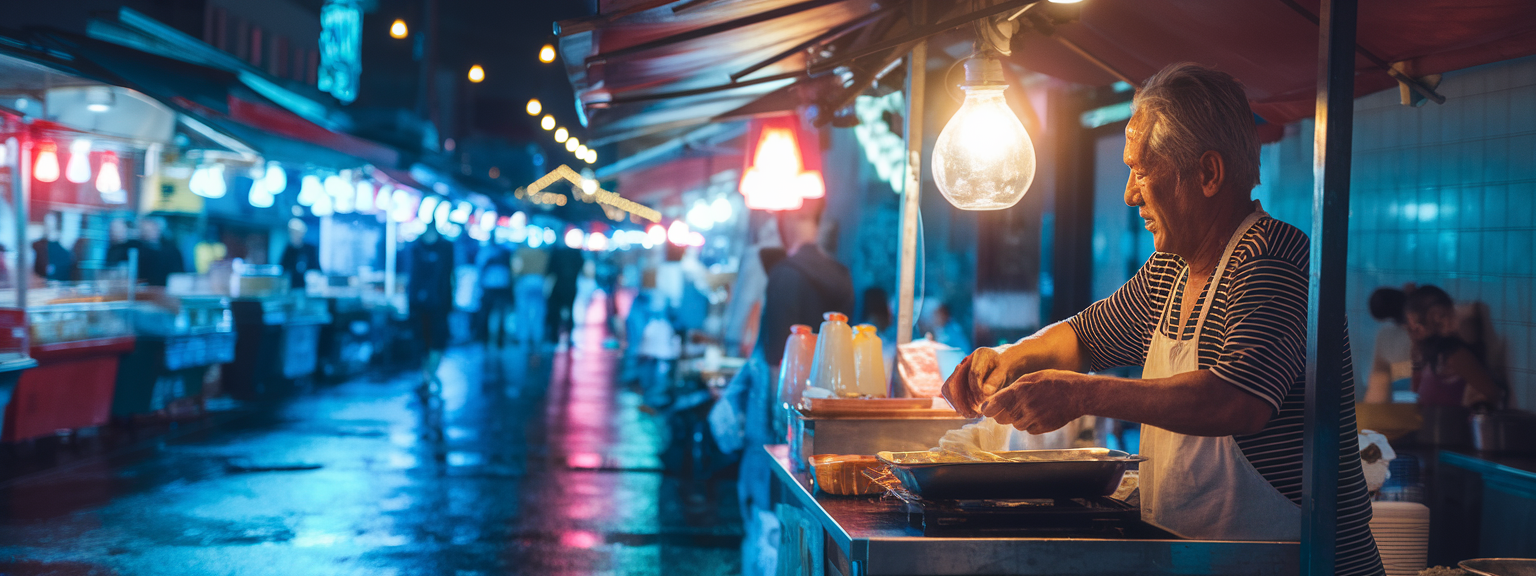
Scenario Overview: Night Market — urban scenes & low-light street photography
This sample scenario shows how to plan and execute a night market shoot. You want a mix of intimate vendor portraits, neon-lit context shots, and motion-blurred crowd scenes. Prepare gear, scout lighting pockets, and prioritize safety while staying light and agile.
Pre-shoot planning and settings
Gear: mirrorless camera with 35mm f/1.8 and 50mm f/1.4. Settings: Aperture Priority f/2.8, Auto ISO with max 6400, minimum shutter 1/125s. RAW capture is essential. Walk the market periphery for 10–15 minutes to map the best lighting pockets and identify vendors with compelling gestures or setups.
Shooting techniques in action
Use the 35mm for environmental portraits to include neon signage. For isolated vendor portraits use 50mm at f/1.8 to separate subject from busy backgrounds. To capture motion, lower the shutter to 1/30–1/60s and steady your stance; embrace blur for atmosphere. In addition, pre-focus on where action will occur to increase capture rate.
Post-processing specific to low-light street photography
Noise reduction is important for images shot at high ISO. Use Topaz Denoise AI or Lightroom with restraint to preserve skin detail. Adjust white balance to correct neon casts and consider a subtle teal-orange grade to maintain atmosphere. Finally, export both a social-sized JPEG and a high-resolution TIFF for archiving or print.
✅ Key Do’s for Effective Usage
Practical do’s for stronger Street Photography
- Do respect legal frameworks and individual dignity when photographing in public spaces.
- Do shoot in RAW to maintain flexibility for exposure and white balance adjustments.
- Do practice zone focusing to increase candid capture rates in predictable zones.
- Do back up images immediately after a shoot to avoid data loss.
- Do study masters like Cartier-Bresson and Garry Winogrand to understand composition and timing.
❌ Common Mistakes to Avoid
Frequent errors and how to correct them
- Avoid carrying too much gear. Too many lenses reduce mobility and increase decision fatigue.
- Avoid relying solely on auto modes for creative control. Learn aperture and shutter priority techniques to control look and motion.
- Avoid ignoring backgrounds. Busy backgrounds can neutralize a strong subject. Reposition or use shallow DOF.
- Avoid over-processing. Heavy effects break authenticity. Keep edits consistent.
🔄 Troubleshooting & FAQs
Technical troubleshooting
Q: My night photos are noisy. How do I reduce noise?
A: Use a faster lens (lower f-number), raise ISO judiciously, and expose toward the right to reduce luminance noise. Apply moderate noise reduction in Lightroom or Topaz Denoise AI. In addition, avoid over-sharpening, which exaggerates noise.
Q: My camera struggles to focus in low light. What helps?
A: Use the AF assist lamp if available, switch to single-point AF on high-contrast areas, or pre-focus manually. Alternatively, find a high-contrast reference in the scene and focus there, then recompose.
Q: How do I freeze motion for candid shots?
A: Increase shutter speed to 1/250s or faster for pedestrians. If light is limited, open aperture and raise ISO. A flash can freeze motion but use it sparingly to maintain candid authenticity.
Frequently asked questions (voice-search friendly)
Q: What camera gear is best for street photography?
A: Small mirrorless bodies with 28–50mm primes are preferred for discretion and quality. Fast lenses (f/1.4–f/2.8) are useful for low-light street photography. Use gear you can comfortably carry.
Q: How can I improve candid street photography without being noticed?
A: Use a single lens, silent shutter when appropriate, zone focusing, and shoot from waist level. Blend into the environment and avoid abrupt movements.
Q: Is it legal to photograph people on the street?
A: Most countries permit photographing people in public spaces, but commercial use may require releases. Always verify local laws and exercise ethical judgment, especially around children and sensitive contexts.
Q: What are the best AI tools for productivity?
A: For photographers, AI tools include Adobe Sensei (within Lightroom/Photoshop) for masking and auto adjustments, Topaz Labs (Topaz Denoise AI and Sharpen AI) for noise and sharpening, Luminar Neo for AI masking and enhancement, and ChatGPT for caption writing and workflow automation. These tools speed repetitive tasks, but always review AI results manually.
🖼️ Bringing It All Together
Create a cohesive street photography series
Conceptualize a theme such as “Commuters at Dawn” or “Neon Nights.” Define constraints: one lens, one hour per day, or one street per week. Constraints sharpen creativity and build discipline. Scout locations several times to understand light and crowd patterns, then shoot with intent: mix candid street photography with a few approached portraits. Sequence images to tell a narrative and apply uniform color grading or monochrome conversion for consistency.
Ready to refine your series? Enter the One-Lens Challenge: shoot with only a 50mm for 30 days and share your top 10 images for critique.
Repeat, review feedback, and iterate. Street Photography mastery is cumulative — technical skill improves with practice, but storytelling and respect for subjects are equally essential. Build a routine, join critique groups, and teach workshops to sharpen your own understanding.
![[Studio portrait with dramatic lighting and color grading to demonstrate stunning images]](https://lenslesson.com/wp-content/uploads/2025/11/advanced-stunning-images-lighting-composition-editing.png "[Stunning Images Lighting And Editing]")
![[Photographer framing a mountain sunrise to demonstrate travel photography tips]](https://lenslesson.com/wp-content/uploads/2025/11/travel-photography-tips-sunset-shot.png "[Travel Photography Tips Sunset Shot]")

![[Portrait photographer adjusting softbox to achieve flattering portrait photography of a smiling subject]](https://lenslesson.com/wp-content/uploads/2025/11/portrait-photography-softbox-lighting-setup.png "[Portrait Photography Lighting Setup]")
![[Flat lay of essential photography gear: camera, lenses, tripod, and camera bag]](https://lenslesson.com/wp-content/uploads/2025/11/photography-gear-essentials-flatlay.png "[Essential Photography Gear Flat Lay]")
