
Macro Photography: Exploring the World of Macro Shots — Techniques, Gear, and Tips
Macro photography reveals a miniature world that often goes unseen. In this guide you will learn practical techniques, recommended gear, and step-by-step workflows for creating compelling macro shots. Whether you want to document tiny subjects scientifically or create fine-art close-ups, this tutorial provides clear, reliable methods to improve your macro photography quickly.
📝 Step-by-Step Guide: Macro Photography Techniques
1. Plan your shoot and choose a subject
Select subjects that match your current skill level. For beginners, choose stationary items: flowers, textured surfaces, coins, or jewelry. For insects and other wildlife, shoot in the cooler hours—early morning or late afternoon—because they move less and are easier to photograph. In addition, overcast days offer diffused light, which reduces harsh contrast and highlights.
2. Select the right gear
- Macro lens: 60–105mm (for general close-up photography) or 180–200mm (for skittish insects).
- Tripod and macro focusing rail for precise framing and focus shifts.
- Lighting: speedlight with diffuser, ring flash, or LED panels for continuous light.
- Optional: extension tubes, diopters, reversing ring, bellows, and focus stacking software (Helicon Focus, Zerene Stacker).
3. Stabilize and compose
Mount the camera on a stable tripod and use a focusing rail if possible. Compose by moving the tripod or rail rather than zooming. Position the most important detail—such as an insect eye or the tip of a stamen—where it will draw the viewer’s attention. In addition, consider negative space to emphasize the subject and create a clean composition.
4. Exposure and focus settings
- Aperture: for single frames, use f/4–f/11. For stacked images, f/8–f/16 balances DoF and diffraction.
- Shutter speed: if handheld, aim for 1/200s or faster. If using flash, sync settings and flash power will dictate shutter choices.
- ISO: keep as low as practical (100–400) to preserve detail and reduce noise.
- Focus: manual focus with live view magnification is the most reliable method. Use focus peaking on mirrorless cameras when available.
5. Lighting and modifiers
Diffuse natural light when available, because it produces soft transitions and preserves detail. When additional light is required, use a speedlight with a small softbox or a ring/twin flash for even illumination. However, avoid flat lighting by angling the light source to reveal texture. For continuous control during stacking, use LED panels so you can preview shadows and highlights in real time.
6. Focus stacking workflow
When depth of field is insufficient, capture a sequence of frames at incremental focus distances. Use a macro rail or small focus steps via live view. Typically, you will need 10–50 frames depending on subject depth. Ensure each frame overlaps the previous by roughly 30–50% to provide smooth stacking. Keep exposure consistent across frames by using manual exposure settings or exposure lock.
7. Post-processing and stacking
Import images and stack them using Helicon Focus, Zerene Stacker, or Photoshop. After merging, retouch stacking artifacts with cloning and healing tools. Apply selective sharpening and noise reduction; avoid global oversharpening because it can emphasize artifacts. Finally, correct color and crop for a strong composition.
📌 Practical Applications: Macro Photography Uses
Nature and scientific documentation
Macro photography is essential for documenting insects, plant structures, and fungi. For example, researchers use close-ups to record morphological details that are not visible in standard images. Therefore, accurate lighting and consistent scale are critical for scientific value.
Commercial and product photography
Product photos for jewelry, watches, and textiles rely on macro shots to communicate craftsmanship. In addition, macro photographs reveal texture and finishing that influence buyer confidence. Use a macro lens and clean, controlled lighting for the best results.
Forensics, inspection, and education
Close-up photography supports forensic analysis, manufacturing QA, and educational content. For example, high-magnification images of circuit boards or welds can reveal defects. In museums and classrooms, macro photography makes microscopic structures accessible to learners.
Fine art and abstract imagery
Macro photography transforms ordinary textures into abstract art. Close-ups of rust, fabric weave, or plant cells emphasize form and color. As a result, artists often use strong lighting and shallow depth of field to create dramatic, intimate compositions.
Practical uses of macro photography are broad. For example, a jeweler might photograph ring settings to show clarity and finish. Similarly, a biologist might document an insect’s pollen load using focus stacking. In every case, intent dictates the gear and workflow chosen.
💡 Tips & Tricks: Macro Photography Essentials
Master working distance
Working distance is the space between your lens and the subject. Longer focal-length macro lenses provide more working distance, which is useful for skittish subjects like insects. If you need more reach, consider teleconverters but be aware they reduce light and may affect autofocus performance.
Control depth of field creatively
At high magnification, depth of field (DoF) is very shallow. Therefore, use focus stacking to combine multiple focal planes. Alternatively, try a tilt-shift lens or a lens-tilt adapter to align the plane of focus with the subject. This method increases apparent DoF without the diffraction penalties of very small apertures.
Use quality light modifiers
Diffuse flash units produce natural-looking light. For example, a small softbox or homemade diffuser (parchment paper) softens highlights. However, ring flashes can flatten texture; mix side lighting or reflectors to recover dimensionality.
Leverage extension tubes and diopters
Extension tubes increase magnification by adding distance between the lens and sensor, without adding glass. Diopters screw onto the front element and act as close-up filters. They are portable and inexpensive, but high-quality macro lenses typically outperform diopters in sharpness and chromatic control.
Minimize vibration and motion
Use mirror lock-up or electronic front-curtain shutter where available. In addition, use a remote release or a self-timer to avoid camera shake. If the subject moves, raise shutter speed or use flash to freeze motion.
📸 Sample Scenario
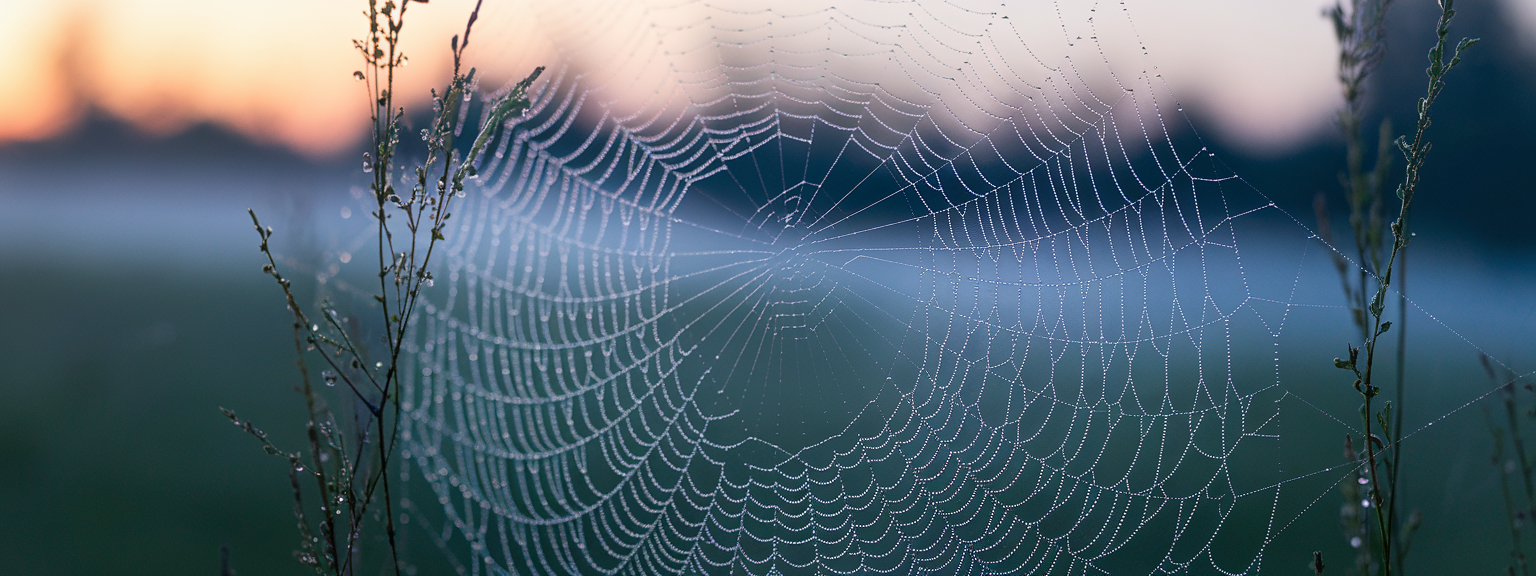
Shooting a dew-covered spider web at dawn
Objective: capture dew droplets on an orb web with clear sharpness on the largest droplets and a pleasing out-of-focus background. For this shoot, arrive at sunrise to catch large dew droplets and soft backlighting.
Recommended gear and settings
- Camera: mirrorless with reliable live view (e.g., Sony, Canon R, Nikon Z).
- Lens: 90–105mm macro lens (1:1).
- Settings: Manual mode, aperture f/8, ISO 200, shutter 1/8–1/60s (adjust for wind). Use a speedlight with diffuser if you need to freeze motion.
- Technique: compose using a tripod, focus on the largest front droplets using live view magnification, and capture 10–20 frames for stacking with incremental focus shifts.
Common challenges and solutions
Wind: wait for calm moments or use flash to freeze droplets. Background clutter: move your perspective, increase subject-to-background distance, or use a small portable background. Reflections: change angle slightly to avoid bright hotspots in droplets.
✅ Key Do’s for Effective Usage
Best practices checklist
- Do use a dedicated macro lens for consistent optical quality at 1:1 magnification.
- Do shoot in RAW to preserve detail for stacking and local adjustments.
- Do stabilize the camera and use live view for precise manual focus.
- Do maintain low ISO and clean optics to reduce noise and dust appearance.
- Do document scale for scientific images by including a ruler or reference object when necessary.
❌ Common Mistakes to Avoid
Frequent errors and quick fixes
- Relying solely on autofocus at high magnification—switch to manual focus to improve precision.
- Stopping down to f/22+ to “increase DoF”—instead, use stacking to avoid diffraction softness.
- Neglecting working distance—back off or choose a longer focal length for skittish subjects.
- Using cheap close-up filters for critical work—prefer a macro lens or high-quality diopter.
🔄 Troubleshooting & FAQs
Problem: Images look soft
Causes include camera shake, subject movement, missed focus, diffraction, or stacking misalignment. Therefore, use a tripod and remote release, preview focus at 100% in live view, and select a slightly wider aperture for single frames. If necessary, stack multiple frames shot at f/8–f/11.
Problem: Too little depth of field
At high magnification, DoF is inherently limited. Use focus stacking, tilt the lens plane, or reduce magnification and crop later. Each option trades working distance, resolution, or field of view, so choose based on your goal.
Problem: Focus stacking artifacts
Artifacts and halos happen when frames are misaligned or overlap is insufficient. Fix this by increasing overlap, using a focusing rail for consistent steps, and choosing appropriate stacking algorithms (pyramidal vs. depth map) in your software. Finally, manually retouch problem areas in Photoshop.
FAQs (voice-search friendly)
- What is macro photography? Macro photography is close-up photography where subjects are reproduced at life-size (1:1) or greater magnification on the sensor.
- Which macro lens should a beginner buy? A 90–105mm 1:1 macro lens is versatile. Alternatively, a 50mm macro is cost-effective for tabletop work.
- How do I increase magnification? Use a true macro lens, extension tubes, bellows, reversing rings, or a teleconverter to adjust magnification and working distance.
- What aperture should I use for macro shots? Use f/4–f/11 for single frames and f/8–f/16 when stacking to balance diffraction and detail.
- How do I focus stack with a tripod? Use a macro rail and move the camera in precise, small increments. Keep exposure and lighting constant and stack frames in Helicon or Zerene.
- What are the best AI tools for productivity? For photographers, AI tools include Adobe Sensei (Lightroom/Photoshop), Topaz Labs (Sharpen AI, DeNoise AI), and DxO DeepPRIME. For general productivity, use Notion AI, ChatGPT for drafts/ideation, and automation tools like Zapier.
- Can I shoot macro with a smartphone? Yes. Use native macro modes, clip-on macro lenses, manual-focus apps, and focus stacking applications to get enhanced depth of field.
🖼️ Bringing It All Together
Macro photography combines technical skill and visual intent. Control magnification, manage depth of field with stacking or tilt techniques, stabilize the camera, and light with deliberate diffusion and angle. In addition, respect your subjects and environment while practicing patience and methodical workflows.
Next steps: practice with household objects to understand magnification and working distance, build a small portfolio of macro shots, and test extension methods before investing in specialized lenses. With methodical practice, your macro photography will improve measurably within weeks.

![[Person writing goals in a notebook to level up your skills]](https://lenslesson.com/wp-content/uploads/2026/01/level-up-your-skills-planning.png "[Level Up Your Skills Notebook]")


![[Person adjusting DSLR settings while learning — Beginner Camera Guide]](https://lenslesson.com/wp-content/uploads/2026/01/beginner-camera-guide-setup-dslr.png "[Beginner Camera Guide Setup]")
![[Photographer editing on a laptop to create Stunning Images with vivid lighting and precise composition]](https://lenslesson.com/wp-content/uploads/2026/01/create-stunning-images-advanced-techniques.png "[Stunning Images Editing Example]")