
Macro Photography: Exploring the World of Macro Shots, Tips & Gear
📝 Step-by-Step Guide: Macro Photography Techniques
Introduction & Intent
Macro photography reveals tiny worlds with rich detail and texture. This guide explains how to plan, set up, shoot, and process close-up photography so you achieve clear, compelling macro shots. In addition, it provides practical examples, gear choices like a macro lens and extension tubes, and advanced workflows such as focus stacking.
Planning and Subject Selection
First, choose a subject that rewards close inspection. Examples include flowers, insect eyes, dew droplets, circuit boards, and textured surfaces. Early morning often offers the best conditions because wind is low and insects are slow. Therefore, scouting time and location matters for successful macro photography.
- Select subjects with clear focal points—an insect’s eye or a flower’s stamen.
- Avoid cluttered backgrounds; move to simplify the scene or use a shallow depth of field.
- Plan for working distance: longer focal lengths give more space between you and the subject.
Gear Setup
Next, prepare equipment. Use a dedicated macro lens where possible, since a true 1:1 macro lens simplifies focusing and gives consistent image quality. However, extension tubes and reversing rings are cost-effective alternatives when you cannot access a macro lens.
- Macro lens options: 50–60mm for close work on crop sensors; 90–105mm for insect distance; 150–200mm for very skittish subjects.
- Extension tubes increase magnification without adding glass; use them for higher close-up magnification.
- Tripod, focusing rail, and remote release reduce camera movement and allow precision at high magnification.
Camera Settings: Aperture, Shutter, ISO, Focus
Set the camera to RAW format first. For many single-frame macro shots, choose an aperture between f/5.6 and f/11. This often balances sharpness and depth of field and avoids the diffraction that appears at very small apertures. However, when you need more DOF, use focus stacking instead of stopping down excessively.
- Shutter speed: use flash or 1/200–1/500s for moving insects; otherwise slower speeds on tripod are acceptable.
- ISO: keep as low as possible to preserve fine detail; raise ISO only as needed to maintain shutter speed.
- Focus: prefer manual focus with live view magnification. If using autofocus, use single-point AF and verify at 100%.
Composing and Focusing: Practical Steps
Compose so the subject’s most important detail is where you place focus. Align the camera plane parallel to the subject when possible; this increases the area that falls within the shallow depth of field. If you cannot align the plane, use focus stacking to unify the subject.
- Use a focusing rail for precise front-back movement at high magnification.
- Check focus using live view at high zoom; slight errors become visible only at 100% crop.
Using Flash and Light Modifiers
Lighting is decisive in macro photography. Diffuse your flash to avoid specular highlights and blown whites. For insect behavior, a short flash duration freezes motion while maintaining low ISO and optimal aperture.
Advanced Technique: Focus Stacking
Focus stacking combines multiple frames focused at incremental distances to produce an image with extended depth of field. It is essential when photographing three-dimensional subjects at high magnification where single-frame DOF would be insufficient.
- Capture a sequence of images with small focus steps; use a rail or micro-focus steps.
- Keep exposure, lighting, and framing constant across the sequence.
- Merge using Zerene Stacker, Helicon Focus, or Photoshop (Auto-Align + Auto-Blend).
Shooting Workflow Checklist
- RAW capture, manual exposure control.
- Tripod and focusing rail when possible.
- Live View at 5–10x magnification for critical focus.
- Aperture in lens sweet spot (f/5.6–f/11) unless stacking.
- Use flash or higher ISO for adequate shutter speed when subjects move.
📌 Practical Applications: Macro Photography Projects
Creative & Fine Art Projects
Macro photography is ideal for abstract work. By isolating texture, form, and pattern you can create images that read like paintings. For example, a tightly cropped petal or rusted metal can become an abstract study in color and shape.
Scientific and Documentational Use
Scientists use macro shots for species identification, morphological study, and behavioral documentation. Focus stacking is particularly useful because it reveals diagnostic features across the specimen’s surface without distortion.
Commercial, Stock, and Product Photography
Commercial clients demand sharp macro images for ecommerce, jewelry catalogs, and advertising. A true macro lens and controlled lighting show surface quality and texture. Therefore, invest in consistent lighting and precise focus for repeatable results.
Educational and Tutorial Content
Macro photography also supports education. Time-lapse sequences of flowers opening or insect behavior create compelling lessons for classrooms. In addition, macro images make microscopic details accessible to a wide audience.
Have you tried a macro photography project that transformed an ordinary subject into an abstract composition? Share which subject surprised you most.
Use projects to build a portfolio of macro shots—textures, flora, and insect studies are high-value content for both artistic and commercial uses. When you plan a series, ensure consistency in lighting, magnification, and post-production so images present as a cohesive set.
💡 Tips & Tricks: Macro Photography Mastery
Core Technical Tips
- Always use live view magnification and focus peaking when available.
- Stabilize your setup; even small movements are magnified at 1:1 or higher.
- Prefer longer focal lengths for insects to maximize working distance and reduce disturbance.
- Use a diffuser on flash to avoid hard hotspots and harsh reflections on shiny surfaces.
- Watch for diffraction: do not rely solely on very small apertures; instead, stack where necessary.
- Carry cleaning gear: dust and tiny particles show up clearly in macro shots.
Practice frequently: set a weekly macro exercise and evaluate technical improvements after each shoot.
📸 Sample Scenario
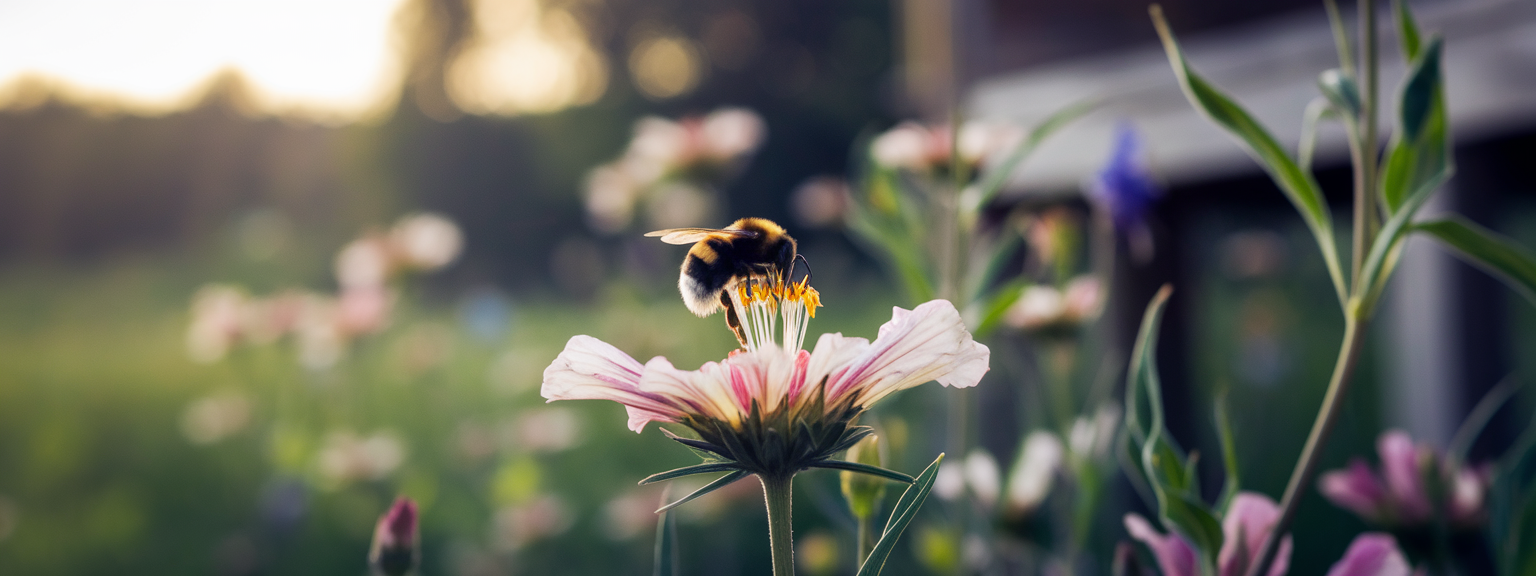
Photographing a Bumblebee on a Flower — Field Workflow
Objective: capture a bumblebee with a sharp eye and visible pollen, natural bokeh, and well-balanced exposure. Below is a practical sequence you can follow in the field.
- Arrive early when bees are cool and less active; dew offers additional visual interest.
- Use a 100mm macro lens or 105mm macro lens for comfortable working distance.
- Mount camera on a low tripod and use a focusing rail to fine-tune composition without moving the camera angle.
- Start at f/8, 1/200s, ISO 200; add diffused flash at 1/8–1/4 power to freeze mild movement.
- Magnify in live view and focus on the bee’s eye; take a short focus bracket series for stacking.
- Review images at 100% on camera; if detail is missing, repeat with slightly adjusted shutter or aperture.
✅ Key Do’s for Effective Usage
Essential Practices
- Do shoot RAW for maximum editing flexibility.
- Do invest in a dedicated macro lens if you intend to pursue macro work seriously.
- Do stabilize camera and subject whenever possible to achieve critical sharpness.
- Do use live view magnification and manual focus for precise results.
- Do plan shoots in calm conditions and at times when insects are less active.
❌ Common Mistakes to Avoid
Pitfalls That Reduce Image Quality
- Avoid relying solely on high ISO to compensate for slow shutter speeds; noise kills fine detail.
- Do not stop down to f/22 to get DOF when stacking would provide better results.
- Do not ignore working distance; getting too close can cast shadows or disturb live subjects.
- Avoid over-processing—excessive clarity and sharpening create halos at macro scale.
🔄 Troubleshooting & FAQs
Common Problems and Solutions
Problem: images appear soft even at expected sharp apertures. Solution: verify your focus point using live view; ensure the tripod head is secure; consider small shutter speed increases or flash to reduce motion blur. Also check for diffraction if you are using very small apertures.
Frequently Asked Questions (Voice-Search Friendly)
Q: What is macro photography?
A: Macro photography is close-up photography that captures very small subjects at high magnification—often at life-size (1:1) or greater—so that fine detail becomes visible.
Q: What gear do I need for macro photography?
A: At minimum: a camera, a macro lens or extension tubes, a tripod, and a lighting source such as a diffused flash or continuous LED. Add a focusing rail and stacking software for advanced work.
Q: How do I get sharp macro photos?
A: Use a tripod, live view magnification, low ISO, mirror lock-up or electronic shutter, and manual focus. Use focus stacking for extended depth of field when necessary.
Q: What aperture should I use for macro shots?
A: Start between f/5.6 and f/11. Balance depth of field with potential diffraction; use stacking for maximum DOF rather than stopping down excessively.
Q: Are extension tubes better than a macro lens?
A: Extension tubes are an economical way to increase magnification on non-macro lenses, but they reduce working distance and do not fully replace the convenience and optical quality of a dedicated macro lens.
Q: How do I photograph small moving subjects like insects?
A: Shoot early in the morning, use a longer macro lens to avoid startling them, and employ flash to freeze motion. Patience and observation of insect habits improve success.
Q: What is focus stacking and how is it done?
A: Focus stacking merges multiple images taken at sequential focus distances to produce a single image with greater apparent DOF. Capture overlapping focus steps and merge with Zerene Stacker, Helicon Focus, or Photoshop.
Q: What are the best AI tools for productivity?
A: For macro photography workflow, useful AI tools include Adobe Lightroom and Photoshop (with Adobe Sensei) for masking and automatic enhancements; Topaz DeNoise AI for noise reduction; and AI features in DAMs for image tagging. These tools accelerate editing and organization.
🖼️ Bringing It All Together
Capture to Final Image Workflow
A structured workflow ensures consistent quality. First, research and scout. Next, stabilize, set RAW capture, and shoot multiple frames including exposure and focus brackets. Then, backup files immediately to multiple locations. Finally, select the best frames, stack if required, and perform careful retouching to preserve natural detail.
Ready to improve your macro photography portfolio? Join a monthly challenge and share your best macro shots for critique.
Creative Exercises to Improve
- One lens, one location for a week—learn how that lens renders magnification and bokeh.
- Focus stacking portrait project—create five stacked images of different small subjects.
- Light variation study—shoot the same subject with natural light, ring flash, and twin flash to compare results.
SEO and Image Alt Text Recommendations
When publishing macro photography online, add descriptive alt text that includes relevant keywords and context. For example: alt=”macro photography of a honeybee eye showing fine hair and pollen – close-up shots”. This improves accessibility and search visibility for macro shots and close-up photography content.
By following these methods—planning, stabilizing, choosing appropriate aperture and lighting, and using focus stacking when needed—you will create macro photography that is both technically precise and visually compelling. Continue to practice, test new lighting, and refine stacking technique; over time your macro lens work will show marked improvement.
![[Studio portrait with dramatic lighting and color grading to demonstrate stunning images]](https://lenslesson.com/wp-content/uploads/2025/11/advanced-stunning-images-lighting-composition-editing.png "[Stunning Images Lighting And Editing]")
![[Photographer framing a mountain sunrise to demonstrate travel photography tips]](https://lenslesson.com/wp-content/uploads/2025/11/travel-photography-tips-sunset-shot.png "[Travel Photography Tips Sunset Shot]")


![[Portrait photographer adjusting softbox to achieve flattering portrait photography of a smiling subject]](https://lenslesson.com/wp-content/uploads/2025/11/portrait-photography-softbox-lighting-setup.png "[Portrait Photography Lighting Setup]")
![[Flat lay of essential photography gear: camera, lenses, tripod, and camera bag]](https://lenslesson.com/wp-content/uploads/2025/11/photography-gear-essentials-flatlay.png "[Essential Photography Gear Flat Lay]")