
Exploring Macro Photography: Techniques, Gear, and Stunning Macro Shots
📝 Step-by-Step Guide: Macro Photography Setup And Shooting
Introduction to macro photography workflow
Macro photography transforms small subjects into expansive, detailed images. In this guide you will learn how to set up a reliable workflow for single-frame macro shots and for focus stacking. For example, whether you are photographing a dew droplet or an insect, clear planning, correct gear, and methodical capture will improve results. This introduction sets the stage for effective close-up photography, especially when using a macro lens or alternatives like extension tubes.
Required gear and recommended alternatives
- Camera: DSLR or mirrorless with manual exposure and live view.
- Macro lens: 60mm, 90–105mm, or 150–200mm depending on subject and working distance.
- Alternatives: extension tubes, bellows, or a reversed 50mm lens for budget macro techniques.
- Support: sturdy tripod, macro rail (optional), and remote release.
- Lighting: diffusers, ring/twin flash, or continuous LEDs for consistent illumination.
- Accessories: reflector/black card, diffuser material, and microfiber cloths for cleaning.
Single-frame macro shots: step-by-step
To capture a single-frame macro shot, begin by stabilizing the camera on a tripod and composing with live view. Next, choose an aperture that balances sharpness and background separation — typically f/5.6 to f/11. Then, focus manually on the most important plane of the subject using live-view magnification. Finally, use a remote release or self-timer to avoid camera shake and bracket exposures when needed for highlights and shadows.
Focus stacking for extended depth of field
When shallow depth of field limits your composition, use focus stacking to combine many frames into one image with extended DOF. Start at the front-most plane you want sharp and move the focus in consistent small increments until you reach the back plane. Use software such as Helicon Focus or Zerene Stacker to align and merge the frames. After stacking, retouch artifacts and apply final sharpening selectively.
📌 Practical Applications: Macro Photography For Nature, Product, And Science
Nature and insect photography
Macro photography is critical for documenting insects, flowers, and small ecological interactions. Use a longer macro lens (150–200mm) or a 100mm with a teleconverter to maintain working distance. In addition, shoot early in the morning when insect subjects are calmer. Use diffused flash to freeze motion and to reduce harsh specular highlights that can obscure micro-details.
Product and jewelry photography
For product close-up photography, control every element: lighting, reflections, and background. Use a light tent, small softboxes, and polarizers to manage reflections on metal or gemstones. Moreover, focus stacking is often essential to achieve edge-to-edge sharpness on three-dimensional objects like rings or watches.
Scientific, forensic, and archival imaging
Macro shots are used in scientific documentation where scale, repeatability, and color accuracy matter. Therefore, include a calibrated scale in the frame, work with consistent diffuse lighting, and capture RAW files for maximum post-processing control. When possible, mount the camera on a copy stand to ensure precise alignment and reproducibility.
Practical application hinges on understanding the subject. For insect photography, study behavior and preferred perches. For product photography, design a repeatable lighting setup. For scientific work, document settings and metadata for reproducibility. Each application benefits from dedicated practice and consistent technique.
💡 Tips & Tricks: Macro Photography Essentials
Focusing strategies and stabilization
- Use live-view magnification and manual focus for precise control.
- Employ a tripod plus remote release and mirror lock-up (for DSLRs) to eliminate vibration.
- For slight focus shifts, use a macro rail or controlled focus breathing via the focus ring.
Lighting and background control
Diffuse light softens highlights and reveals texture, while directional light emphasizes form. Therefore, combine diffusers with small reflectors to model the subject. Also, manipulate the background by creating distance between subject and backdrop or by placing a colored card behind the subject to produce uniform bokeh.
Lens and accessory selection
- Choose a true macro lens (1:1) for best optics; a 100mm is versatile and a 180–200mm gives working distance for insects.
- Use extension tubes to increase magnification with existing lenses for budget macro techniques.
- Consider focus stacking tools and software early when you expect shallow depth of field to be limiting.
📸 Sample Scenario
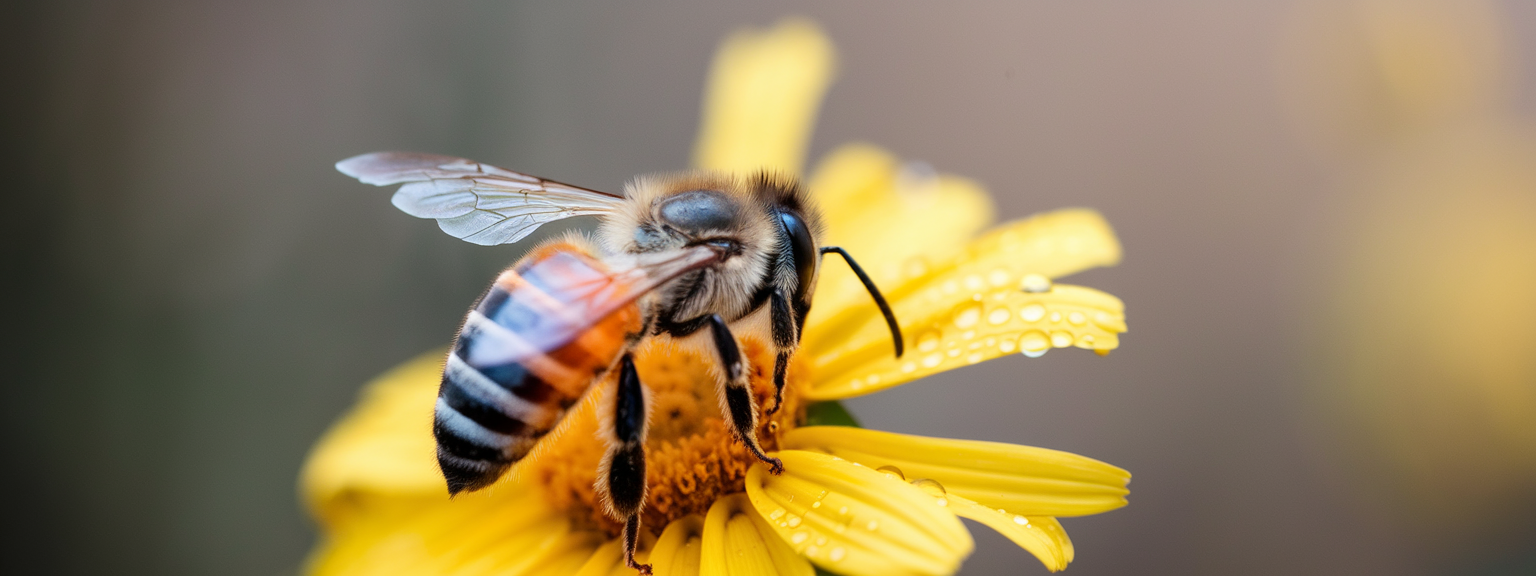
Photographing a honeybee on a wildflower — complete workflow
Goal: a sharp, well-composed macro shot of a honeybee with the eye and thorax in focus and smooth background bokeh. First, scout a patch of flowers and arrive early when bees are cooler and less active. Next, set up a 100–180mm macro lens on a tripod or monopod for mobility. Use a diffused off-camera flash to freeze motion and fill shadows. Choose f/5.6–f/8 to balance depth of field and background separation, and aim for a shutter speed of 1/200–1/800s with ISO 200–800 depending on light and flash power. Lastly, prefocus on a likely landing spot and shoot bursts; then select the sharpest frames in post-processing.
Post-processing and ethical considerations
In post, crop for composition, selectively sharpen the bee’s eye, and reduce noise as required. Also, avoid overstated clarity that introduces halos. Importantly, practice ethical fieldcraft: do not disturb nests or handle wild bees, and do not disclose exact locations of rare species.
✅ Key Do’s for Effective Usage
Checklist of best practices
- Do invest in a true macro lens for consistent 1:1 reproduction.
- Do stabilize the camera and subject as much as possible.
- Do shoot in RAW and bracket exposures or focus frames when unsure.
- Do diffuse your light and control reflections for clean micro-detail.
- Do practice focus stacking techniques to overcome shallow depth of field at high magnification.
- Do maintain gear cleanliness; dust is visible at macro scales.
❌ Common Mistakes to Avoid
Frequent errors and how to fix them
- Relying solely on autofocus; instead, use manual focus and live-view magnification.
- Shooting too wide open expecting broad sharpness; close down aperture or stack frames.
- Ignoring wind; use a wind blocker or shoot in sheltered spots.
- Using excessive noise reduction; preserve micro-detail by controlling ISO at capture.
- Neglecting background control; place neutral backgrounds or adjust camera angle.
🔄 Troubleshooting & FAQs
My macro photos are soft — what should I check?
First, verify focus using live view magnification. Second, stabilize the camera and subject; if necessary, increase shutter speed or use flash. Third, experiment with aperture — many macro lenses are sharpest at f/5.6–f/8. Finally, consider focus stacking when a single frame cannot capture sufficient depth of field.
Why is depth of field so shallow even at f/11?
Depth of field decreases dramatically as magnification increases. Therefore, at macro distances you may have only millimeters of sharpness. In this case, either reduce magnification, increase working distance, or use focus stacking to achieve full subject sharpness.
How do I focus stack without a motorized rail?
Manually adjust the focus ring in small, consistent increments and capture overlapping frames. Use live view and magnify to monitor focus progression. While less precise than a motorized rail, careful technique and extra frames will usually produce a successful stack.
How many images do I need for a focus stack?
The number varies by magnification and subject depth. For modest subjects at 1:1 you might use 6–12 frames. For complex 3D insect forms you may need 30–100+ frames. Always capture extra frames at the extremes for safety.
What’s the best lens for insect photography?
A 180–200mm macro lens gives the longest working distance and is ideal for skittish insects. A 100mm macro is versatile and excellent in many situations. A 60mm macro is useful in studio or tabletop setups where working distance is less critical.
Should I use flash for macro photography?
Yes, flash is advisable when you need to freeze motion or increase shutter speed under high magnification. Use diffusers or small softboxes to avoid harsh specular highlights. Consider twin-flash setups for modeling texture and form.
What are the best AI tools for productivity?
Although not directly tied to macro photography, AI tools can streamline workflow. For example, use ChatGPT for caption drafting, Notion AI for organization, and Luminar Neo or Topaz Labs for AI-assisted image enhancement. Additionally, Adobe Firefly can help with creative variations and rapid mock-ups.
How do I prevent condensation on lenses outdoors?
Allow gear to acclimate inside your bag before exposure to cold or humid air. Use silica gel packs in your bag and avoid wiping lenses while condensation is present. If condensation forms, let it dissipate naturally before wiping with a microfiber cloth.
🖼️ Bringing It All Together
Final workflow checklist
- Plan subject, background, and time of day.
- Prepare gear: macro lens or extension tubes, tripod, flash, and remote release.
- Set camera to RAW, select base ISO, and choose aperture targets.
- Stabilize, compose, and magnify in live view to focus.
- Bracket exposures and capture focus brackets if needed.
- Backup files and process stacks with Helicon Focus, Zerene Stacker, or Photoshop.
- Sharpen selectively, remove artifacts, and export at required resolution.
Macro photography rewards patience and practice. Begin with simple subjects and a modest setup — for instance, a 50mm lens with extension tubes — then refine lighting, focusing, and stacking techniques over time. As you progress, invest selectively in a dedicated macro lens and a focusing rail to expand your capabilities.
Use the checklist above to structure your next shoot. Remember that careful attention to working distance, lighting, and focus control will yield consistent, professional macro shots. With deliberate practice you will master close-up photography and produce images that reveal the micro-world in compelling detail.
![[Sunrise over a mountain valley with wildflowers in the foreground — landscape photography showing golden-hour light and wide-angle composition.]](https://lenslesson.com/wp-content/uploads/2025/12/landscape-photography-breathtaking-sunrise-scene.png "[Breathtaking Landscape Photography Sunrise]")
![[Person at desk using laptop and notebook to level up your skills]](https://lenslesson.com/wp-content/uploads/2025/12/level-up-your-skills-planning-workspace.png "[Level Up Your Skills Workspace]")
![[Person journaling at a sunlit desk capturing daily creative inspiration with a notebook and coffee.]](https://lenslesson.com/wp-content/uploads/2025/12/daily-creative-inspiration-journaling-ideas.png "[Daily Creative Inspiration Journaling]")
![[Photographer editing images on a monitor demonstrating post processing essentials workflow]](https://lenslesson.com/wp-content/uploads/2025/12/post-processing-essentials-overview.png "[Post Processing Essentials Demo]")
![[Photographer adjusting studio lights for Stunning Images during a portrait session.]](https://lenslesson.com/wp-content/uploads/2025/12/advanced-stunning-images-lighting-composition-editing.png "[Stunning Images Lighting Composition]")