
Landscape Photography: How to Capture Breathtaking Landscapes
📝 Step-by-Step Guide: Landscape Photography Essentials
Pre-production: Scout, plan, and visualize
Landscape photography begins long before the shutter is pressed. Effective planning reduces surprises and increases creative choices. Use apps such as PhotoPills and The Photographer’s Ephemeris to calculate sun position and golden hour timing. In addition, use Google Earth to preview approach routes and vantage points. Scout on foot where possible, and otherwise scout virtually. Identify foreground elements, leading lines, and safe positions. Create a shot list that includes a hero frame, complementary detail shots, and bracketed exposures for high dynamic range scenes.
Gear selection and preparation
- Camera: full-frame bodies give superior dynamic range and low-light performance; APS-C is acceptable with adjusted focal lengths.
- Lenses: include a wide-angle (14–35mm), a standard zoom (24–70mm), and a telephoto (70–200mm or 100–400mm) for compressed perspectives.
- Stability: a sturdy tripod with a low center of gravity is essential for long exposure and focus stacking.
- Accessories: polarizer, ND filters (3, 6, 10-stop), graduated ND, remote release/intervalometer, lens cloths, spare batteries, and weather protection.
Arrival and setup
Arrive early — typically 30–90 minutes before golden hour. This gives time to set up and explore alternate compositions. Mount the camera on the tripod and level the head. Compose using rule-of-thirds, leading lines, and strong foreground anchors. In addition, check for distractions at the frame edges and adjust your stance accordingly.
Camera settings fundamentals
- Shoot RAW for maximum latitude in post-processing.
- ISO: keep at base ISO (100–200) to minimize noise.
- Aperture: most lenses are sharpest between f/5.6 and f/11; avoid extreme apertures that cause diffraction.
- Shutter speed: use a tripod for exposures longer than 1/60s; apply reciprocal rule for handheld shooting.
- Focus: use single-point AF for a primary subject, then verify with live view magnification; switch to manual for critical work.
Composition and creativity in-camera
Foreground interest adds depth and scale. Therefore, include stones, driftwood, or tide pools to anchor the viewer. Use leading lines such as rivers or paths. Layer scenes from foreground to background and use negative space to simplify when needed. Complementary colors, such as warm foregrounds and cool skies, increase visual impact.
Advanced capture techniques
- Bracketing and exposure blending: capture ±2 EV stops and blend in Lightroom or Photoshop to manage high dynamic range scenes.
- Focus stacking: take multiple frames at incremental focus distances to blend for front-to-back sharpness.
- Panorama stitching: maintain 30% overlap, consistent exposure, and keep the camera level to avoid parallax.
- Long exposure with NDs: use a tripod, remote release, and mirror lock-up or electronic shutter to smooth water and create cloud motion.
In-camera checks and review
Check the histogram and avoid clipping highlights. Zoom in on a 100% preview to confirm sharpness. Recompose and capture variations in both portrait and landscape orientations. Log settings and conditions in a field notebook or app for post-processing reference.
Post-processing workflow
Import RAW files to Lightroom or Capture One. Cull selects and perform base RAW adjustments: white balance, exposure, highlights recovery, and shadow lift. Apply lens profile corrections and remove chromatic aberration. Use local adjustments — graduated filters to balance skies and adjustment brushes to bring out foreground texture. For complex merges, create HDRs, panoramas, or focus stacks in Photoshop. Finally, sharpen with masking and apply noise reduction only where necessary.
📌 Practical Applications: Landscape Photography Projects And Uses
Fine art and wall prints
Landscape photography lends itself to gallery-quality prints. For example, stitch panoramas for ultra-high resolution. Choose print techniques such as giclée on cotton rag or metallic prints for vivid color and deep blacks. Also, frame images with slight extra space to allow for cropping and matting.
Travel and tourism marketing
High-quality landscape photography is valuable for destination marketing. Create a series that shows a location at sunrise, midday, and sunset to illustrate variety. In addition, provide multiple crops and color-matched files to suit websites and print collateral.
Commercial and editorial uses
Outdoor brands and editorial clients often require curated landscape backdrops. Deliverables typically include multiple crops, color-matched exposures, and retouched sky replacements when permitted. Always label editorial changes transparently.
Conservation and storytelling
Landscape photography can document environmental change and support conservation efforts. For instance, create time-lapse sequences and before/after panoramas. These visual records often drive public interest and funding for preservation projects.
Education, workshops, and stock
Lead workshops to share techniques such as focus stacking, long exposure, and composition. Build a stock portfolio that includes seasons, weather types, and times of day to maximize licensing opportunities. Consistent metadata and keywording boost discoverability.
Have you considered building a themed series (for example: foggy mornings, tidal pools, or starfields) to sell as a portfolio to tourism boards or galleries?
Practical applications of landscape photography extend beyond art. They provide revenue through prints, licensing, workshops, and conservation partnerships. To succeed, maintain a consistent brand and deliver images with clear usage rights and high technical standards.
💡 Tips & Tricks: Landscape Photography Settings And Composition
Golden hour and blue hour mastery
Golden hour and blue hour offer the richest color and softest light. Therefore, arrive early and stay late. Use backlighting for rim light to separate subjects. Alternatively, favor front light when you need saturated colors in foreground elements.
Using wide-angle lenses effectively
Wide-angle lenses exaggerate foreground scale and increase perceived depth. However, be mindful of distortion at the edges. Place a strong foreground anchor near the bottom third and lead the eye into the midground.
Long exposure technique
For silky water and cloud streaks, calculate base exposure and then add ND filter factors. Use a remote release, mirror lock-up, and a stable tripod to eliminate shake. If wind is strong, lower the tripod center column and remove loose accessories.
Polarizer and graduated ND use
A circular polarizer deepens skies and reduces reflections. However, on ultra-wide lenses it can create uneven polarization. Use graduated ND filters to balance bright skies. For irregular horizons such as trees, prefer soft grads or exposure blending.
Action step: next time you shoot, pick one advanced technique (focus stacking, exposure blending, or long exposure) and dedicate an entire session to mastering it.
Composition variations and perspective
Don’t stop at the first pleasing frame. Move low to emphasize foreground scale, then climb higher to simplify a busy scene. Shoot horizontal and vertical crops. Also, include a human figure or tree to convey scale where appropriate.
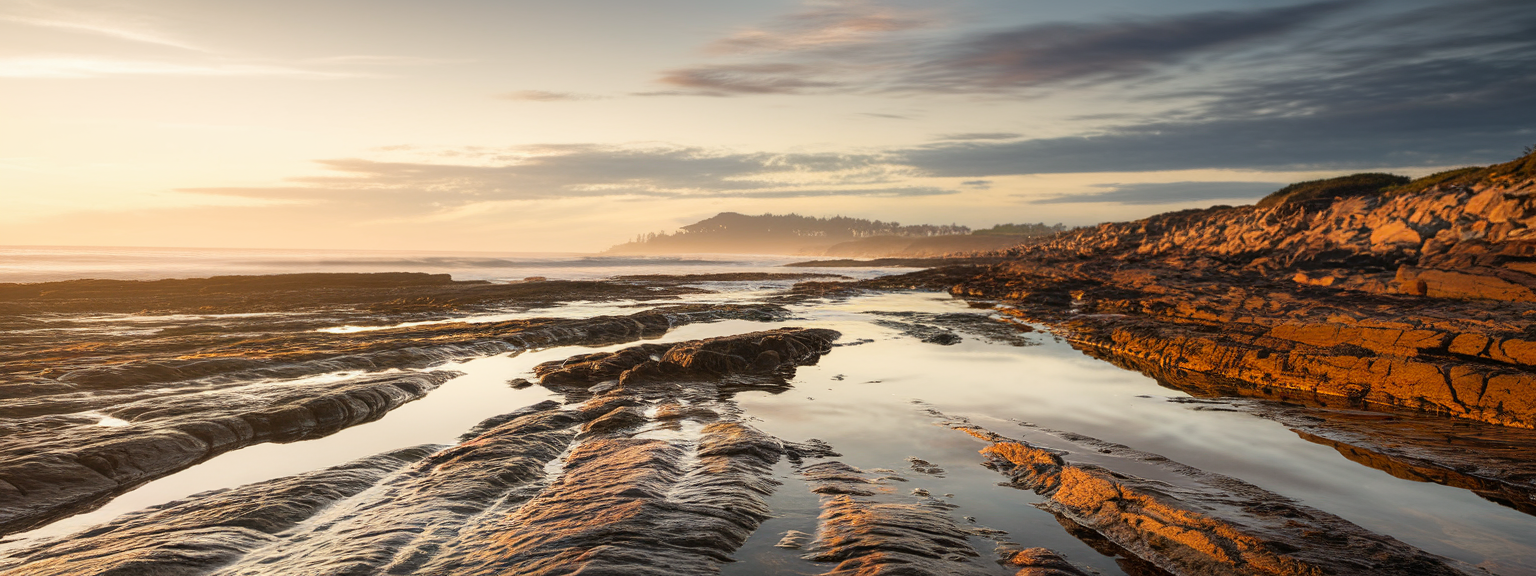
📸 Sample Scenario
Scenario overview: Coastal sunrise with tide pools
This practical sample demonstrates how to plan and execute a sunrise panorama on a rugged coastline. Use landscape photography techniques such as wide-angle framing, focus stacking, and long-exposure water smoothing to produce a dramatic final image suitable for prints and editorial use.
Planning and timing
Check tides to ensure exposed foreground rocks and pools. Use PhotoPills to calculate sun azimuth so the rising sun hits reflective pools at the correct angle. Arrive 45 minutes before sunrise to explore and set up.
Gear and configuration
- Camera: full-frame mirrorless with good low-light performance.
- Lens: 16–35mm set to 16mm for wide vistas.
- Filters: polarizer for reflections; 6-stop ND for 3–30 second silky water.
- Accessories: tripod, remote, bubble level, cloths, spare batteries.
Capture plan and sample settings
Start with bracketed base exposures (ISO 100, f/11, ±2 EV) to capture the wide dynamic range of sunrise. Then attach the 6-stop ND and make long exposures for the water (3–30s depending on light). Capture focus stacks (foreground, midground, background) at the same aperture and exposure settings to ensure consistent blending.
Post-processing strategy
Merge panorama images first, then blend bracketed exposures for the sky and long-exposure layer for silky water. Use layer masks to integrate components precisely. Apply targeted clarity and texture to foreground elements while preserving smooth water tones. Finally, sharpen and denoise per output requirements.
✅ Key Do’s for Effective Usage
- Do shoot RAW for maximum editing latitude.
- Do plan with PhotoPills, TPE, and weather apps.
- Do use a sturdy tripod for long exposures and focus stacking.
- Do bracket exposures for high dynamic range scenes.
- Do include a strong foreground element to create depth.
- Do keep ISO low to minimize noise and maximize dynamic range.
- Do practice exposure blending rather than over-relying on aggressive HDR presets.
- Do maintain gear hygiene and immediate backups after each shoot.
- Do prioritize safety over a risky composition or precarious vantage point.
❌ Common Mistakes to Avoid
- Overusing polarizers or NDs without checking for uneven effects in wide-angle scenes.
- Ignoring the histogram and allowing highlights to clip irrecoverably.
- Shooting a single frame and not exploring variations of composition.
- Using excessive HDR processing that creates halos and unrealistic colors.
- Relying exclusively on auto modes instead of deliberate manual control.
- Choosing extreme apertures such as f/22 that introduce diffraction softening.
- Improper tripod setup: loose head, extended center column, or unbalanced load.
- Forgetting to level the horizon — simple but jarring when overlooked.
🔄 Troubleshooting & FAQs
Why are my landscape images soft?
Soft images often result from missed focus, camera shake, or diffraction. Therefore, verify focus with live view magnification. Use a tripod and mirror lock-up or electronic shutter to eliminate vibration. Also, avoid very small apertures like f/22 unless necessary.
How do I expose for a bright sky and dark foreground?
Use graduated ND filters to darken the sky, bracket exposures and blend in post, or expose for highlights and recover shadows in RAW if headroom exists. Spot metering on critical highlights helps prevent clipping. When possible, capture multiple exposures for blending.
What shutter speed should I use for silky water?
For mild smoothing use 1/4–1s. For classic silky texture aim for 1–8s. For extreme smoothing with a 10-stop ND filter, exposures of 30s or longer are common. Use a tripod and remote shutter to prevent camera motion.
How do I maintain sharpness across the frame?
Use focus stacking for front-to-back sharpness. Alternatively, set focus to the hyperfocal distance and use an aperture near the lens sweet spot (f/8–f/11). Verify sharpness at 100% in live view during capture.
Which lens is best for landscape photography?
A wide-angle lens (14–35mm on full-frame) is highly versatile for expansive vistas and including foreground interest. A 24–70mm standard zoom complements with flexibility. Telephoto lenses are valuable for isolating details and compressing perspective.
How should I use a polarizer on a wide-angle lens?
Rotate the polarizer slowly and observe the sky for uneven darkening. For ultra-wide scenes, the effect can be non-uniform; in such cases, consider shooting without a polarizer or using partial rotation.
What are the best AI tools for productivity?
AI tools enhance planning and editing workflows. For example, Adobe Sensei in Lightroom/Photoshop accelerates masking and sky replacement. Topaz Labs (DeNoise AI, Sharpen AI) improves noise and detail. ChatGPT or other LLMs assist with shot lists, captions, and SEO metadata. However, always verify AI edits and retain creative control.
How do I export images for print vs. web?
For print: export at 300 DPI and use Adobe RGB or ProPhoto RGB when supported by the print lab. For web: convert to sRGB and resize to suitable pixel dimensions (for example, 1920px on the longest side) while balancing compression and quality.
🖼️ Bringing It All Together
Landscape photography is a synthesis of planning, technical control, and creative composition. Practice deliberately; focus one session on composition and another on technical skills like focus stacking or long exposures. As a result, your images will improve steadily.
Ready to improve your portfolio? Share three of your recent landscape photography shots and request a focused critique to accelerate your learning.
Action plan: build a weekly practice schedule, review each shoot critically, and allocate time for post-processing learning. Use AI tools to speed repetitive tasks, but always refine outputs manually. Finally, share images for feedback — community critiques are invaluable for growth.
Landscape photography rewards patience, curiosity, and repeated practice. Study light and composition, and apply techniques such as bracketing, focus stacking, and panorama stitching. Over time, your skill set will expand and your portfolio will become more compelling.
![[Person taking an outdoor portrait demonstrating Quick Photo Tips]](https://lenslesson.com/wp-content/uploads/2025/12/quick-photo-tips-better-photos.png "[quick-photo-tips-outdoor-portrait]")
![[Photographer capturing candid subjects at a busy city crosswalk for street photography]](https://lenslesson.com/wp-content/uploads/2025/12/street-photography-candid-crosswalk-urban.png "[Street Photography Crosswalk]")
![[Photographer using high shutter speed to capture an athlete mid-jump in sharp action shots with a blurred background]](https://lenslesson.com/wp-content/uploads/2025/12/action-shots-pro-tips-freeze-motion.png "[Action Shots Athlete Mid-Jump]")

![[Flat-lay of must-have photography gear including camera, lenses, tripod, camera bag, and lighting accessories]](https://lenslesson.com/wp-content/uploads/2025/12/must-have-photography-gear-flatlay.png "[Must-Have Photography Gear Flatlay]")
![[Close-up of a ladybug on a leaf showcasing macro photography detail and texture]](https://lenslesson.com/wp-content/uploads/2025/12/macro-photography-ladybug-close-up.png "[ladybug-macro-photography]")

