
Landscape Photography: How to Capture Breathtaking Scenes Anywhere
📝 Step-by-Step Guide: Landscape Photography
Introduction
Landscape Photography requires a reliable workflow, deliberate planning, and consistent practice. In this guide you will learn practical steps for planning shoots, choosing gear, composing compelling images, and processing RAW files to create scenic landscape photos that stand out. The advice below is organized to support photographers of all levels, from beginners mastering landscape photography tips to advanced shooters refining outdoor photography techniques.
1. Planning and Scouting
Effective Landscape Photography begins before you leave home. First, define the story you want the scene to tell. Then use planning tools to time the light and weather. For example, PhotoPills and The Photographer’s Ephemeris are indispensable for mapping sun and Milky Way positions. In addition, consult tide charts and local weather models so you arrive prepared for the conditions you want.
2. Essential Gear and Preparation
- Camera: Full-frame mirrorless or DSLR for best dynamic range; crop-sensor bodies are fine for learning Landscape Photography.
- Lenses: A wide-angle lens (14–35mm) for vistas, a 24–70mm for versatility, and a telephoto for compression and detail.
- Tripod, remote release, polarizer, ND and GND filters, spare batteries, and a weatherproof backpack.
3. Camera Settings Basics
Shoot RAW and keep ISO low (typically 50–400). Start with a mid-range aperture (f/8–f/11) for sharpness. For motion, adjust shutter speed: fast for freezing details, long exposure for silky water or cloud streaks. Use exposure bracketing when dynamic range exceeds your sensor.
4. Composing with Intent
- Rule of Thirds: Position the horizon on the upper or lower third depending on whether the sky or land is more compelling.
- Foreground Interest: Add rocks, wildflowers, or tide pools to create depth and scale.
- Leading Lines and Layers: Use rivers, paths, and ridgelines to guide the viewer through the scene.
5. Focus and Depth Techniques
Use hyperfocal distance for maximum depth-of-field. When foreground detail must be perfectly sharp with a distant horizon, consider focus stacking. In low light, switch to manual focus and zoom in on live view to confirm sharpness.
6. Exposure Control and Advanced Techniques
Apply graduated ND filters to balance bright skies with darker foregrounds. For long exposure daytime shots, use strong ND filters (6–10 stops). For scenes beyond dynamic range, bracket and blend exposures or create HDR with care to keep a natural look.
7. Field Workflow
- Set up tripod and level the camera.
- Meter, check histogram, and protect highlights first.
- Capture variations: different shutter speeds, focal lengths, and compositions.
8. Post-Processing Workflow
Import RAW into Lightroom or Capture One. Apply lens corrections, adjust exposure and white balance, and perform selective local edits. For complex blends, use luminosity masks in Photoshop. Finally, sharpen and export appropriate sizes for web or print.
📌 Practical Applications: Landscape Photography
Fine Art, Editorial, and Commercial Uses
Landscape Photography skills translate directly to fine art prints, travel editorial work, stock images, and environmental documentation. For example, large-resolution panoramas and subtly graded HDR images perform well in galleries. In addition, clean compositions with negative space work best for stock and commercial use because they leave room for overlays and text.
Scientific and Environmental Applications
For time-series documentation—such as glacial retreat or coastline erosion—use consistent framing and record precise EXIF data. That consistency makes comparisons valid and useful for research and conservation projects.
Social Media and Teaching
Share behind-the-scenes workflow clips, before/after edits, and short explanations of techniques like long exposure and using a wide-angle lens. These practical demonstrations help build an audience and improve SEO for your content.
Use the checklist above and the sample scenarios in this guide to plan a shoot that serves your goals—whether that goal is scenic landscape photos for print, editorial imagery for travel publications, or documentation for environmental records.
💡 Tips & Tricks: Landscape Photography
Composition & Creative Techniques
- Arrive 30–60 minutes before golden hour. The light changes rapidly, so prepare compositions early.
- Include foreground interest—rocks, flowers, or reflections—to anchor your composition and enhance depth.
- Use leading lines to guide the viewer; rivers, paths, and ridgelines work well.
- Shoot multiple focal lengths: wide for context, medium for mid-composition, and telephoto to compress layers.
Technical & Exposure Tricks
- Silky water: use ND filters and multi-second exposures; start at 5–10s and vary speed for the desired texture.
- Polarizer: rotate to reduce reflections and enrich skies; expect about a one-stop exposure loss.
- Panorama technique: overlap frames by 30% and maintain consistent exposure and white balance across frames.
Focus & Sharpness
For maximum sharpness, focus using live view magnification. If you have close foreground interest, consider focus stacking with 3–6 frames. Remember that diffraction reduces sharpness at very small apertures; f/8–f/11 is usually optimal.
📸 Sample Scenario
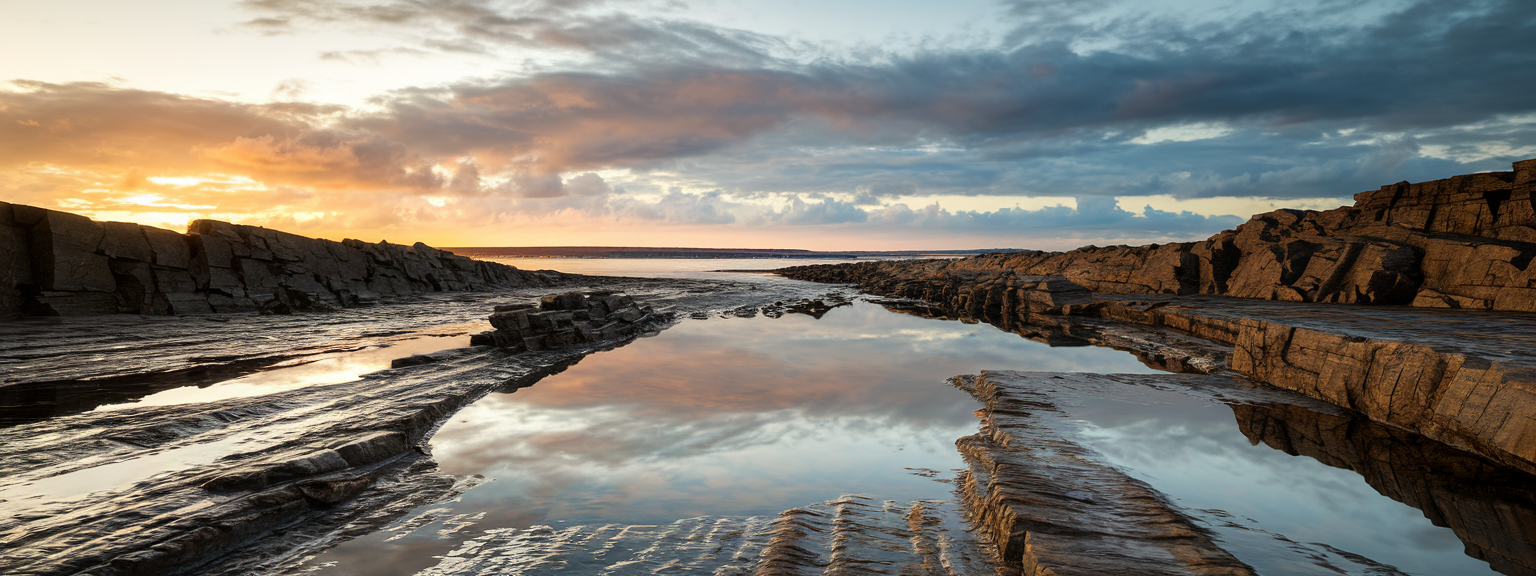
Scenario: Rugged Coast Sunrise with Tide Pools
This realistic example applies Landscape Photography techniques to capture scale, motion, and texture along a rocky coast. Plan for low tide, arrive early, and scout tide pools that reflect the sky. Use a wide-angle lens for an establishing pano, a 10-stop ND for silky water shots, and a mid-range zoom for tide pool detail.
Settings and Sequence
- Wide pano: 16mm, f/11, ISO 100, bracket exposures ±1 EV if sky is bright.
- Long exposure waves: 16–24mm, f/8–f/11, ISO 100, 5–20s with 10-stop ND; vary shutter speed for creative options.
- Tide pool close-up: 35mm, f/8–f/11, ISO 100, 1/30–1/125s; use polarizer to control reflections as needed.
This sequence yields a cohesive set of scenic landscape photos that show both the broad vista and the intimate details of the coastline. In post, blend bracketed frames for balanced exposure, stitch panoramas for high resolution, and selectively dodge and burn to guide the viewer’s eye.
✅ Key Do’s for Effective Usage
Practical Rules
- Do shoot RAW to maximize editing flexibility.
- Do plan with PhotoPills or TPE to time golden hour and moon phases.
- Do include foreground interest to create depth and scale.
- Do protect equipment from elements and back up files in the field.
❌ Common Mistakes to Avoid
Frequent Errors and How to Fix Them
- Shooting only at midday: Choose golden or blue hour for more pleasing light.
- Ignoring the horizon level: Use camera grid or correct in post to avoid distraction.
- Overusing HDR: Blend exposures manually for natural tonality instead of relying on aggressive presets.
- Using too small an aperture (diffraction): Prefer f/8–f/11 on many lenses for optimal sharpness.
🔄 Troubleshooting & FAQs
Troubleshooting Common Problems
Blurry images despite a tripod? Check tripod stability, disable lens stabilization when mounted, and use a remote shutter or self-timer. If highlights are blown out, use a GND filter or bracket exposures and blend in post. If foreground is soft while background is sharp, use hyperfocal focus or focus stacking.
FAQs (Voice-Friendly)
Q: What camera is best for landscape photography? A: Choose a camera with strong dynamic range and good RAW support. Full-frame mirrorless (Sony A7, Canon R, Nikon Z) are excellent choices. Crop-sensor bodies are viable for beginners and budget-conscious photographers.
Q: What are the best lenses for landscape photography? A: Use a wide-angle lens for expansive vistas, a 24–70mm standard zoom for versatility, and a telephoto to isolate distant subjects. A rectilinear ultra-wide reduces distortion for architectural or horizon work.
Q: How do I capture silky smooth water? A: Use a tripod, low ISO, small aperture, and ND filters to extend shutter speeds to several seconds. Test multiple exposure durations for the look you want.
Q: What is hyperfocal distance and when should I use it? A: Hyperfocal distance is the focus point that maximizes depth-of-field from half that distance to infinity. Use it for wide scenes with important foreground elements.
Q: What are the best AI tools for productivity? A: Many photographers use Adobe Sensei for automated masking and selection in Lightroom and Photoshop. Topaz Gigapixel AI aids upsizing for prints, and Luminar Neo offers AI sky replacement. Evaluate each tool by running a trial and comparing results to your quality standards.
🖼️ Bringing It All Together
Summary and Final Recommendations
Landscape Photography is both an observational art and a technical discipline. Plan shoots for light and weather, compose with foreground interest and leading lines, and control exposure to protect highlights. In post-processing, favor subtle, natural edits that retain the scene’s mood.
Begin with the fundamentals: practice composition, learn to read light, and master exposure. Then expand into long exposure, focus stacking, and HDR with restraint. Revisit locations under different conditions and document your settings to refine your approach. With repetition and careful analysis, your ability to produce breathtaking scenic landscape photos will improve steadily.
For additional resources, consult the sample scenarios above and explore advanced tutorials on panorama stitching and astrophotography. Use the keywords in this post—Landscape Photography, landscape photography tips, scenic landscape photos, and outdoor photography techniques—when tagging your images and writing alt text to improve discoverability.

![[Person writing goals in a notebook to level up your skills]](https://lenslesson.com/wp-content/uploads/2026/01/level-up-your-skills-planning.png "[Level Up Your Skills Notebook]")


![[Person adjusting DSLR settings while learning — Beginner Camera Guide]](https://lenslesson.com/wp-content/uploads/2026/01/beginner-camera-guide-setup-dslr.png "[Beginner Camera Guide Setup]")
![[Photographer editing on a laptop to create Stunning Images with vivid lighting and precise composition]](https://lenslesson.com/wp-content/uploads/2026/01/create-stunning-images-advanced-techniques.png "[Stunning Images Editing Example]")
![[Creative entrepreneur brainstorming products on a laptop and notebook — turning passion into profit]](https://lenslesson.com/wp-content/uploads/2025/12/turning-passion-into-profit-guide-1.png "[Turning Passion Into Profit Strategy]")