
Landscape Photography: Capture Breathtaking Scenery Like a Pro
📝 Step-by-Step Guide: Landscape Photography
Introduction
Landscape photography requires planning, technical knowledge, and creative intent. In this step-by-step guide you will learn how to plan shoots, apply landscape composition techniques, work golden hour photography, and execute long exposure and HDR processing. For example, focusing on foreground interest and using a tripod will immediately improve your images. Therefore, this guide emphasizes practical steps you can reproduce in the field.
1. Conception & Planning
Define the story you want to tell before you leave home. Decide whether you are emphasizing scale, texture, color, mood, or a landmark. Next, scout locations using PhotoPills, The Photographer’s Ephemeris (TPE), and Google Earth. In addition, review social platforms like Instagram to understand popular vantage points, but plan a unique composition.
- Check weather and tide charts (Windy, MeteoBlue) to time coastal shots.
- Plan golden hour photography: arrive 60 minutes early and stay 30 minutes after the golden window.
- Confirm permissions and access—many parks require permits for commercial shoots.
2. Gear Selection
Select gear that supports your intent. A sturdy tripod is indispensable. Choose a wide-angle lens for expansive scenes, and a telephoto to compress distant elements. Pack spare batteries and memory cards. For long exposure and HDR processing, include ND filters and a remote shutter.
- Camera: full-frame or APS-C mirrorless/DSLR.
- Lenses: wide-angle lens (16–35mm), telephoto for detail shots.
- Filters: circular polarizer, GND, ND for long exposure.
3. Set Up & Composition
Composition is the foundation of strong landscape photography. Use the rule of thirds, but break it intentionally when symmetry calls for it. Include foreground interest to create depth. Use leading lines and layers (foreground, middle ground, background) to guide the eye.
- Orientation: choose landscape or portrait based on the subject—waterfalls and cliffs often work better vertically.
- Avoid important elements near extreme edges of a wide-angle lens to reduce distortion.
4. Camera Settings (Basic to Advanced)
Begin with a base exposure that preserves highlights. Keep ISO low (50–200) for dynamic range. Use f/8–f/16 for depth-of-field but avoid extreme apertures like f/22 that cause diffraction. For handheld shots, apply the reciprocal rule. For long exposure, use ND filters and extend shutter speeds to achieve the desired motion blur.
- Focus: manual or back-button focus; use hyperfocal distances or focus stacking for near-to-far sharpness.
- White balance: shoot RAW; adjust in post to refine golden hour warmth.
- Bracket exposures (3–7 shots at ±1–2 EV) for HDR processing in high dynamic range scenes.
5. Shooting Techniques
Apply techniques deliberately. For golden hour photography, begin shooting 60 minutes before sunrise and continue after sunset. For long exposure, use a tripod and a neutral density filter. For HDR processing, ensure consistent framing across brackets and use ghost removal when elements move.
6. Immediate Field Review
Always check the histogram and review critical focus at 100% magnification. If highlights clip or the focus is soft, recompose and reshoot. Small adjustments in camera height or focal length often yield large improvements.
7. Post-Processing Workflow
Process with a clear workflow: import, cull, RAW adjustments, lens corrections, HDR blending or focus stacking, local adjustments, noise reduction, and final color grading. Use Lightroom, Photoshop, and AI tools such as Topaz DeNoise AI or Luminar Neo as accelerators.
📌 Practical Applications: Landscape Photography
Fine Art & Gallery Prints
High-resolution landscape photography excels as fine art. Use careful composition, focus stacking, and panoramic stitching to create prints that hold detail at large formats. Soft-proof images and manage color using ICC profiles for consistent print results.
Commercial & Stock Photography
Commercial clients require clean, adaptable images. Provide negative space for copy, deliver multiple crops, and maintain natural color. For stock, prepare both horizontal and vertical crops and include descriptive alt text that contains terms such as landscape composition, wide-angle lens, and golden hour photography.
Travel Content & Social Media
Use a consistent style and publish series like “Golden hour photography of the Alps.” For engagement, explain your process including camera settings and mention tools (tripod, polarizer, ND filter) to build credibility. Short captions that outline technique perform well.
Environmental & Conservation Work
Landscape photography can document environmental change. Use HDR processing sparingly for accurate representation. Record metadata and timestamps to support scientific or advocacy use. Images that show glacier retreat or habitat restoration are powerful tools for conservation messaging.
💡 Tips & Tricks: Landscape Photography
Composition and Visual Flow
Use leading lines, layers, and foreground interest to create depth. For example, a tide pool or fallen log serves as an anchor. Apply the rule of thirds yet remain ready to break it for strong central symmetry.
Maximize Sharpness
Use a solid tripod and disable VR/IS when mounted. Use mirror lock-up or electronic front curtain to reduce vibration. Focus in live view and zoom to confirm critical sharpness.
Long Exposure Tricks
For silky water use exposures from 1 to 30 seconds depending on water speed and the effect desired. Use ND filters for daytime long exposure. To remove crowds, use 2–30 second exposures to blur moving people while retaining static subjects.
HDR Processing Best Practices
Bracket conservatively and use ghost removal for moving elements. Prefer natural-looking HDR results by reducing global clarity if the image looks hyper-real. For complex scenes, manual exposure blending in Photoshop yields the most controlled outcome.
Optical and Practical Considerations
Watch for wide-angle distortion and correct it in post with lens profiles or transform tools. When foreground elements are very close, consider focus stacking to maintain sharpness from near to far. Pack a lens cloth to remove spray and condensation while shooting coastal scenes.
AI & Editing Tools
Use AI tools such as Luminar Neo for careful sky replacement and Topaz DeNoise AI for noise reduction. However, use AI sparingly for documentary or conservation images to preserve authenticity. AI can accelerate repetitive tasks, therefore boosting productivity.
📸 Sample Scenario
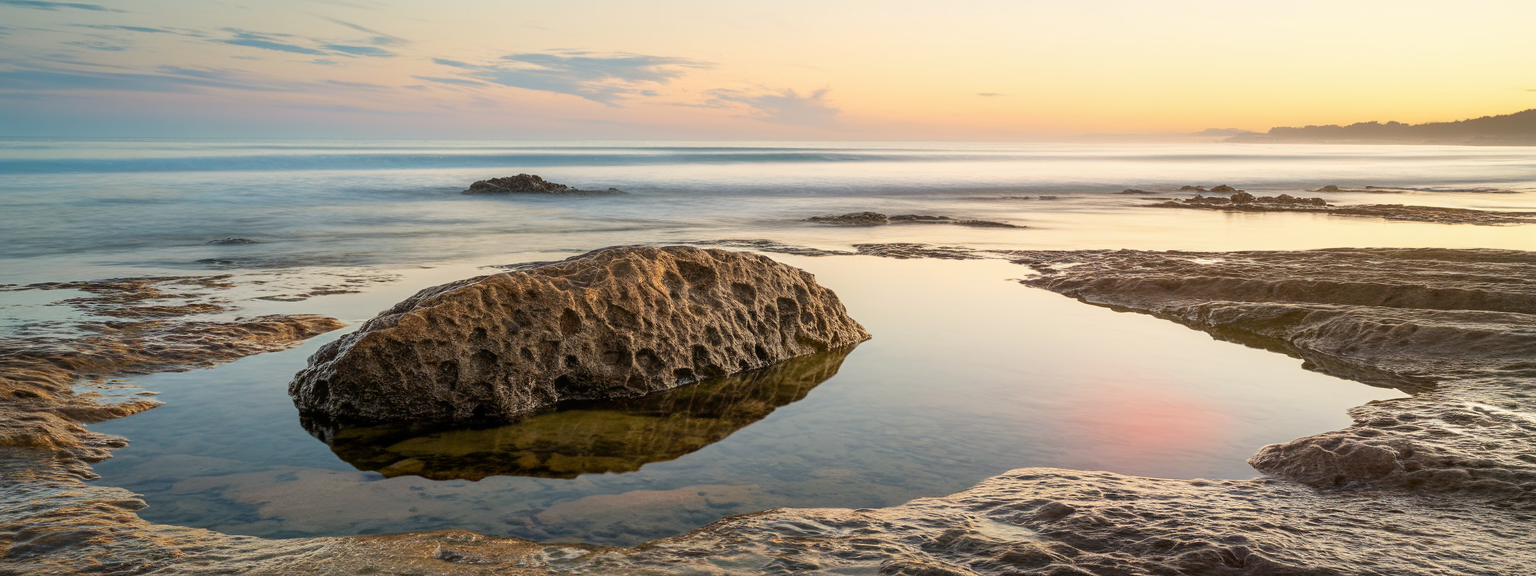
Sunrise Seascape with Foreground Rocks — Full Workflow
Objective: Capture a dramatic sunrise seascape featuring foreground rocks, smooth water via long exposure, and the warm tones of golden hour photography. This scenario demonstrates how composition, exposure, and post-processing interact to create a balanced image.
Planning and Gear
Choose a rocky coastline with tide pools and a natural leading line. Bring a tripod, wide-angle lens (16–35mm), 6-stop ND filter, circular polarizer, and a remote shutter. Arrive 60 minutes before sunrise to scout and set up.
Field Execution
Compose so the horizon sits on the upper third to emphasize foreground interest. Start with ISO 100, f/11, and meter mid-tones. Add the ND filter and lengthen shutter to 4–8 seconds for silky waves. If dynamic range is high, bracket three exposures at ±2 EV for HDR processing.
Post-Processing
Import RAW files and merge brackets if needed. Reduce highlights, lift shadows, and apply lens corrections for the wide-angle lens. Use graduated filters to balance sky and foreground. Finally, selectively sharpen the foreground and apply noise reduction in the sky.
✅ Key Do’s for Effective Usage
Essentials
Do use a tripod for long exposure and HDR processing. Do place meaningful foreground interest to create depth. Do shoot RAW to retain maximum editing flexibility. Do plan for golden hour photography to maximize light quality. In addition, keep a field log of settings and location to refine your technique over time.
Workflow Habits
- Do check histograms and magnify images to confirm sharpness in the field.
- Do bracket in scenes with wide dynamic range for later HDR processing.
- Do respect the environment and follow Leave No Trace principles.
❌ Common Mistakes to Avoid
Frequent Errors
Avoid relying solely on mid-day shooting—light is harsh and flattens texture. Do not overuse HDR or clarity; this causes halos and unnatural tones. Also avoid ignoring tripod stability, and always check for vignetting when stacking filters on a wide-angle lens.
Technical Oversights
- Failing to disable VR/IS on a tripod can introduce blur.
- Forgetting to check histograms risks clipped highlights or blocked shadows.
- Using aggressive AI sky replacements in conservation work undermines credibility.
🔄 Troubleshooting & FAQs
Why are my landscape photos soft even on a tripod?
Check tripod stability and ensure the center column is secure. Disable stabilization (VR/IS) when using a tripod. Use a remote shutter or 2-second timer. Confirm focus at 100% magnification and use mirror lock-up or electronic shutter when available. Also avoid overly long shutter speeds with telephoto lenses unless the tripod is extremely stable.
How do I avoid blown-out skies during sunset?
Use a graduated neutral density filter or bracket your exposures for HDR processing. If shooting RAW, underexpose slightly to protect highlights and recover shadows during post-processing. For example, take a base exposure and a +2 EV shot to capture foreground detail.
What aperture is best for landscapes?
Typically f/8 to f/16 balances sharpness and depth-of-field. Use hyperfocal focusing for quick field work. If foreground is extremely close, consider focus stacking to maintain sharpness front-to-back.
How long should my long exposure be for silky water?
For small streams, 0.5–2 seconds smooths texture; coastal waves often require 1–8 seconds. To fully smooth large bodies of water or create pronounced cloud motion, experiment with 30 seconds to several minutes using strong ND filters.
How do I fix perspective distortion from a wide-angle lens?
Use lens profile corrections in Lightroom or Capture One. For severe perspective issues, use manual transform tools or a tilt-shift lens. For panoramas, carefully align and stitch frames to preserve straight horizons.
What are the best AI tools for productivity?
For general productivity, tools like ChatGPT, Notion AI, Microsoft Copilot, and Otter.ai assist with drafting, organization, and meeting notes. For photographers, use Adobe Lightroom (AI masking), Luminar Neo (sky tools), Topaz Labs (DeNoise AI, Sharpen AI), and DxO PureRaw for denoise and lens corrections. Use AI to automate repetitive edits, but verify results for accuracy.
🖼️ Bringing It All Together
Summary
Landscape photography rewards careful planning, technical discipline, and creative experimentation. Master the essentials: tripod technique, landscape composition, correct exposure, and post-processing workflows including HDR processing and focus stacking. Use tools such as a wide-angle lens and polarizer to achieve specific looks.
Consistent practice produces measurable improvement. Revisit locations at different times and under varying conditions to refine your sense of light and composition. Keep a log of camera settings and reflect on what works; as a result, your images will become more compelling and technically precise.
![[Person at desk using laptop and notebook to level up your skills]](https://lenslesson.com/wp-content/uploads/2025/12/level-up-your-skills-planning-workspace.png "[Level Up Your Skills Workspace]")
![[Person journaling at a sunlit desk capturing daily creative inspiration with a notebook and coffee.]](https://lenslesson.com/wp-content/uploads/2025/12/daily-creative-inspiration-journaling-ideas.png "[Daily Creative Inspiration Journaling]")
![[Photographer editing images on a monitor demonstrating post processing essentials workflow]](https://lenslesson.com/wp-content/uploads/2025/12/post-processing-essentials-overview.png "[Post Processing Essentials Demo]")
![[Photographer adjusting studio lights for Stunning Images during a portrait session.]](https://lenslesson.com/wp-content/uploads/2025/12/advanced-stunning-images-lighting-composition-editing.png "[Stunning Images Lighting Composition]")
