
Advanced Techniques for Stunning Images: Lighting, Composition & Editing — Stunning Images
Stunning Images are achieved through deliberate choices in lighting, composition, and post-processing. In this guide you will learn advanced photography techniques and image editing tips that move you from competent to exceptional. This introduction outlines a full workflow so you can plan, shoot, and finish images with consistent quality and a professional aesthetic.
📝 Step-by-Step Guide: Stunning Images Creation
1. Previsualization and Planning
Define the goal for each session before you arrive. Whether the brief is portraiture, product work, landscape, or conceptual art, create a mood board that includes color palettes, reference images, and compositional sketches. In addition, scout locations to note natural light direction and potential reflections. Planning reduces wasted time and ensures your lighting techniques and photo composition choices are intentional.
2. Camera Setup & RAW Capture
- Always shoot RAW to preserve dynamic range and color information.
- Use base ISO (100–200) for clean files; increase only when necessary for motion or low light.
- Choose aperture to control depth of field: f/1.8–f/5.6 for portraits; f/5.6–f/11 for landscapes.
- Set shutter speed relative to focal length (1/(focal length)) and subject motion.
- Prefer custom white balance or Kelvin values in mixed lighting; RAW lets you fine-tune later.
3. Core Lighting Techniques
Lighting techniques define mood and separation. Use natural golden hour for soft warm highlights and long shadows. For portraits, employ off-camera flash or strobes with modifiers. Softboxes and large diffusers create flattering light; grids and snoots sculpt light for drama. High-speed sync is essential when you need shallow depth of field in bright conditions. Continuous LEDs are useful for hybrid stills and video workflows.
4. Composition Techniques for Impact
- Rule of thirds: Place your focal point along a grid line for balanced energy.
- Leading lines: Use architecture or landscape lines to guide the viewer.
- Negative space: Create visual breathing room to emphasize subjects.
- Perspective & focal length: Wide angles tell environment stories; telephotos compress and isolate.
- Foreground interest: Add depth with near-plane elements in landscape photography.
5. Advanced Capture Options
Use bracketing for HDR scenes and focus stacking for product and macro work. For long exposures apply neutral density (ND) filters to smooth water or clouds. For creative effects, combine flash painting with long shutter speeds. These methods extend what you can capture in-camera and increase flexibility in post-processing.
6. Non-Destructive Post-Processing Workflow
- Import and cull with Lightroom, Capture One, or PhotoMechanic.
- Start global adjustments: exposure, contrast, highlights, shadows, whites, and blacks.
- Apply lens corrections and crop for framing balance.
- Use local masks and brushes for targeted exposure and color control.
- Advanced retouch: frequency separation, dodge & burn for sculpting form, and careful spot removal.
- Finish with sharpening and selective noise reduction; export with intent (print, web, or social).
7. Final Review and Delivery
Proof images at 100% to inspect noise, halos, and retouch seams. Soft-proof for print using ICC profiles. Save layered PSD or TIFF masters and export final JPEG/PNG copies. Back up assets to both local RAID/NAS and cloud storage; maintain a versioned catalog for revisions.
📌 Practical Applications: Stunning Images in Photography & Marketing
Weddings & Events
In fast-paced environments, apply off-camera flash with high-speed sync to freeze motion while preserving ambient light. For consistent galleries use batch color grading and a streamlined retouching checklist. For example, bounce flash with a diffuser during a reception provides flattering light without harsh shadows.
Commercial & Product Photography
Precision matters in product work. Use small softboxes, strip lights, and reflectors for crisp separation and soft highlights. Focus stacking ensures edge-to-edge sharpness. In addition, match color using calibrated swatches and soft-proofing to meet brand requirements.
Portrait & Editorial
For editorial portraits, combine environmental storytelling with refined portrait retouching. Use Rembrandt or loop lighting to model the face, and then apply frequency separation plus subtle dodge & burn for a natural finish. Color grading should support mood without masking skin tones.
Landscape & Travel
Leverage golden hour and graduated ND filters for balanced skies. Use foreground elements and panoramic stitching for immersive scenes. Post-process via exposure blending or focus stacking when required to maintain detail from foreground to infinity.
Do you want a customized checklist for your primary genre (portraits, landscapes, or product) to implement these advanced photography techniques and image editing tips on your next shoot?
Practical application combines technical skill with efficient workflow. For marketing, use hero images created with these methods as landing page banners. They influence conversion by communicating quality and trust. As a result, a consistent approach to producing Stunning Images will improve brand perception and client satisfaction.
💡 Tips & Tricks: Stunning Images Techniques
- Expose to the right (ETTR) to capture more tonal data, however avoid clipping highlights.
- Work in a 16-bit color workflow for smoother color grading and fewer banding artifacts.
- Create and save custom presets and LUTs to maintain a recognizable look across shoots.
- Feather masks to produce natural transitions between edits and avoid hard edges.
- Calibrate your monitor and create ICC profiles for reliable color reproduction in print and web.
- Use small catchlights and reflectors to bring life to eyes in portrait photography.
- Use targeted noise reduction before sharpening to preserve fine detail.
- Shoot tethered in the studio for rapid feedback and faster client approvals.
Take one workflow element this week — tethered capture, preset creation, or a retouch checklist — and implement it on a live shoot to measure time saved and quality gains.
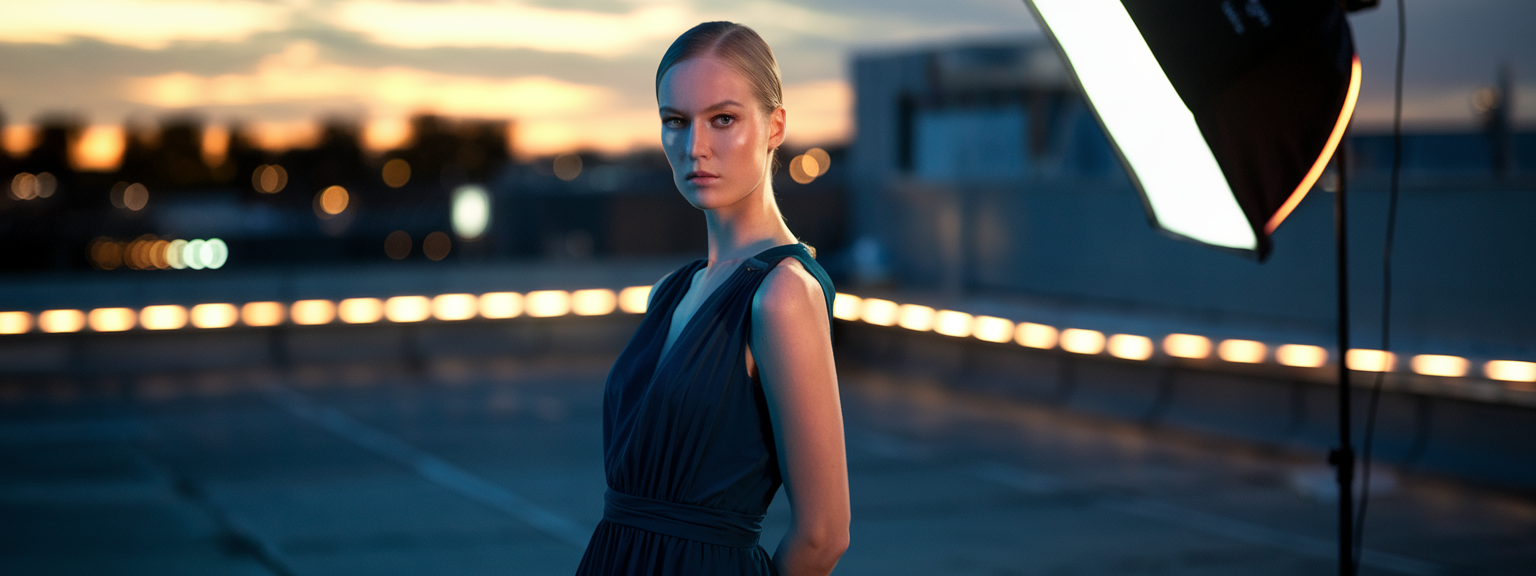
📸 Sample Scenario
Outdoor Fashion Portrait at Sunset — Full Workflow
Objective: Create a cinematic fashion portrait that balances warm sunset highlights with teal shadow grading. Prep involves mood boards, wardrobe matching, and choosing modifiers: a 36” octabox for key, a grid spot for hair rim, and a silver reflector for fill.
On-Location Setup
- Position subject with sun behind for rim light and separation.
- Place octabox camera-left at 45° and slightly above eye level for flattering catchlights.
- Use 85mm at f/2.8 for subject separation and background compression.
- Shoot at 1/200s and ISO 100 to sync with strobes; adjust power to balance ambient light.
Capture Strategy
Bracket exposures for the sky and capture a mix of flash and no-flash frames for composite flexibility. Use shallow depth-of-field for subject isolation, and capture several frames for selection and retouching.
Post-Processing
- Import RAW files; rate and flag top 10 images for detailed editing.
- Perform global exposure adjustments: recover highlights and lift shadows.
- Color grade: gentle teal shift in shadows and warm highlights using HSL and split toning.
- Retouch: frequency separation for skin smoothing and dodge & burn to sculpt features.
- Finalize sharpening and export optimized web and print versions with embedded profiles.
✅ Key Do’s for Effective Usage
- Do shoot RAW for maximum post-processing latitude.
- Do plan lighting and composition before arriving on set; a mood board saves time.
- Do bracket high-contrast scenes and consider exposure blending for natural results.
- Do keep edits non-destructive: use virtual copies and layered files.
- Do invest in good modifiers, calibrated monitors, and consistent color targets.
- Do develop signature presets and LUTs to build a cohesive visual brand.
- Do implement multi-layer backups: local + cloud for redundancy.
❌ Common Mistakes to Avoid
- Avoid overexposing highlights; once clipped they cannot be recovered reliably.
- Do not over-retouch skin: preserve texture and pores for authenticity.
- Do not ignore white balance in mixed lighting; use gels or correct in RAW.
- Avoid excessive sharpening that produces halos; always check at 100%.
- Don’t rely only on automatic modes; manual control produces consistent outcomes.
- Do not skip monitor calibration when preparing files for print.
🔄 Troubleshooting & FAQs
My highlights look blown in JPEG but not in RAW. Why?
JPEG is baked-in according to camera picture profiles. RAW retains sensor data so highlights can often be recovered. Therefore shoot RAW for high dynamic range scenes, and bracket exposure when needed. Use graduated ND filters for landscapes when highlights exceed sensor range.
How can I avoid harsh midday shadows in portraits?
Position the subject in open shade or use a large diffuser between the sun and subject. Fill with a reflector or a low-power fill flash. For wider apertures use high-speed sync or wait for softer light.
What shutter speed for silky water long exposures?
Start at 1–4 seconds for moderate silkiness; for very smooth water, use 15–30 seconds or more with stronger ND filters. Always use a sturdy tripod and remote release to avoid camera shake.
How do I reduce noise without losing detail?
Apply luminance noise reduction selectively, and denoise before sharpening. Consider AI-powered tools like Topaz DeNoise AI for challenging high-ISO files. Use masking to protect critical detail areas such as eyes.
My composite looks fake. How to blend better?
Match perspective, depth-of-field, grain, and color grade across layers. Add subtle shadowing where objects meet surfaces. Use global LUTs and shared color adjustments to unify the composite.
What are the best AI tools for productivity?
For photographers, AI tools accelerate repetitive tasks and enhance quality. Consider Adobe Photoshop (Neural Filters, Generative Fill) for complex edits and compositing. Lightroom Classic with Adobe Sensei speeds masking and auto-tagging. Topaz Labs (Gigapixel AI, DeNoise AI, Sharpen AI) offers world-class upscaling and denoising. Luminar Neo provides fast sky replacement and relighting. For workflow, PhotoMechanic plus AI scripts accelerates culling; Notion AI or Asana assist project planning and caption generation. Combine Lightroom for RAW adjustments, Topaz for denoising, and Photoshop for final composites to create an efficient pipeline.
My RAW files look flat. Where to start?
RAW files are intentionally neutral. Begin with white balance, exposure, and highlight recovery. Use curves for contrast and add clarity/texture for midtone definition. Proceed to selective color adjustments and local masks.
🖼️ Bringing It All Together
Consistency in creating Stunning Images requires a repeatable system. Previsualize and plan, capture with intention, and implement an efficient non-destructive post-processing pipeline. Establish signature color grades and a retouch standard to ensure every image aligns with your creative brand.
Ready to elevate your portfolio with a consistent workflow? Subscribe for presets, LUTs, and step-by-step walkthroughs to produce more Stunning Images, faster.
Continuous learning and tool optimization are essential. Experiment with AI tools to speed routine tasks, but maintain artistic control so that technique supports taste. Finally, implement quality control for client delivery, and back up your work to secure the value you create.

![[Photographer shooting a sunset over coastal cliffs demonstrating travel photography tips]](https://lenslesson.com/wp-content/uploads/2025/11/travel-photography-tips-sunset-cliffs-gear-composition.png "[travel-photography-tips-sunset-cliffs]")
![[Photographer capturing a candid couple crossing a busy city street, demonstrating Street Photography techniques in an urban scene]](https://lenslesson.com/wp-content/uploads/2025/11/street-photography-candid-urban-moment-1.png "[Street Photography Candid Moment]")
![[Photographer using fast shutter to capture athletes mid-air for Action Shots.]](https://lenslesson.com/wp-content/uploads/2025/11/perfect-action-shots-high-speed-photography.png "[Action Shots Capture]")