
Advanced Techniques for Stunning Images: Pro Photography & Editing Tips
📝 Step-by-Step Guide: Stunning Images Creation
Introduction & workflow overview
Creating stunning images requires a disciplined workflow, precise capture, and intentional post-processing. In this guide you will learn advanced photography techniques and image editing tips that professionals use to deliver gallery-quality work. Therefore, start with planning and end with calibrated export. The process covers pre-shoot planning, capture strategies, and a pro-level post pipeline that supports HDR, color grading, and refined composition.
1. Pre-shoot planning and visualization
- Define the story and mood: pick palettes and determine whether you want dramatic contrast or soft, pastel tones.
- Scout locations and timing with PhotoPills or Sun Surveyor to plan light direction and composition rules.
- Pack essentials: tripod, ND filters, polarizer, remote, lens cloth, spare batteries, and backup storage.
- Develop a shot list and define focal lengths for wide, medium, and tight frames.
2. Camera settings fundamentals (advanced tweaks)
Always shoot RAW to retain dynamic range and editing latitude. For exposure strategy, use ETTR carefully to retain shadow detail without clipping highlights. If a scene has extreme dynamic range, bracket and plan for HDR or exposure fusion.
- Aperture: Landscapes f/8–f/16 and portraits f/1.8–f/4. Use focus stacking when needed.
- Shutter speed: Use the reciprocal rule as a baseline, and use long exposures for motion effects.
- ISO: Keep ISO low (50–400) when practicable; modern sensors allow 800–3200 with careful denoising.
- White balance: Set neutral WB in-camera and refine in RAW using gray cards or eyedropper tools.
3. Advanced capture techniques
- Bracketing & HDR: Capture ±1–2 EV sets across 3–7 frames on a tripod for exposure blending.
- Focus stacking: Use a rail and capture sequential focal steps for macro and extreme landscape depth.
- Panoramas: Overlap 25–35% with consistent exposure and use a nodal slide to avoid parallax.
- Long exposures: Use 6–10 stop ND filters for silky water and cloud streaks; engage mirror lock-up and remote release.
- Off-camera flash: Control contrast with ratio lighting and modifiers such as grids and softboxes.
4. Capture workflow checklist
- Compose, lock exposure, and review histogram.
- Bracket or stack frames; verify overlap and focus consistency.
- Check focus at 100% for critical shots and record metadata or notes.
📌 Practical Applications: Stunning Images
Landscape photography
Use focus stacking, exposure bracketing, and panorama stitching to create dramatic landscape scenes. For example, merge HDR exposures to manage highlights and shadows, then apply luminosity masks for targeted contrast. Composition rules such as leading lines and foreground interest improve visual depth. When you aim for stunning images in landscapes, deliberate foreground placement and controlled color grading are essential.
Portrait photography
Use off-camera flash and rim light to sculpt faces. Shoot wide apertures to separate subject from background. In post, apply subtle dodge & burn and frequency-aware retouching. To retain natural skin texture, avoid heavy smoothing. These steps will help you produce stunning images with professional portrait finishes.
Architectural & interior
Tilt-shift lenses or perspective correction prevent converging lines. Bracket interior exposures to balance bright windows and darker rooms. For commercial-grade results, correct perspective before color grading. This approach results in clean, professional images suitable for portfolios and client deliveries.
Product & commercial
Use controlled lighting setups, focus stacking for macro detail, and strict color management with a color-checker. For product shots, maintain consistent angles and retouch precisely. As a result, you will deliver images that accurately represent the product and meet print or e‑commerce requirements.
Astrophotography
Implement star tracking and stacking workflows with dark, bias, and flat frames to reduce noise and remove gradients. Compose with a foreground element for scale. After stacking, use selective sharpening and color balance to preserve subtle Milky Way tones. These advanced methods make it possible to create stunning images of the night sky.
What subject would you like to master next — landscapes, portraits, architecture, or astrophotography?
Each genre benefits from tailored capture and post-processing tactics. By combining advanced photography techniques with disciplined post work, you can produce consistent, marketable images. For example, combine HDR with selective color grading to emphasize mood while preserving natural details in highlights and shadows. Keep testing and documenting settings so you can reproduce successful workflows.
💡 Tips & Tricks: Stunning Images
Practical tips for better capture
- Use the histogram, not the LCD, to judge exposure and avoid clipping.
- Back-button focus for consistent focusing in moving or portrait subjects.
- Handheld HDR is possible with modern alignment tools; however, prefer a tripod for critical work.
- Calibrate your monitor for accurate color grading and print matching.
Practice one technique until you can repeat it reliably — consistency builds a portfolio and confidence.
Post-processing shortcuts and recommendations
Use multi-stage sharpening: apply capture sharpening in your RAW converter, then refine selectively in Photoshop. For noise, use modern denoising tools such as Topaz DeNoise AI. When performing HDR, prefer exposure fusion or manual layer blends to avoid overcooked, surreal results. In addition, create and use LUTs for consistent color grading across series and clients.
Composition and lighting techniques
- Apply composition rules intentionally: golden ratio, negative space, and leading lines.
- For studio work, measure light ratios and use grids to control spill and contrast.
- For landscapes and architecture, use polarizers and graduated ND filters as needed but prefer bracketing where skies are complex.
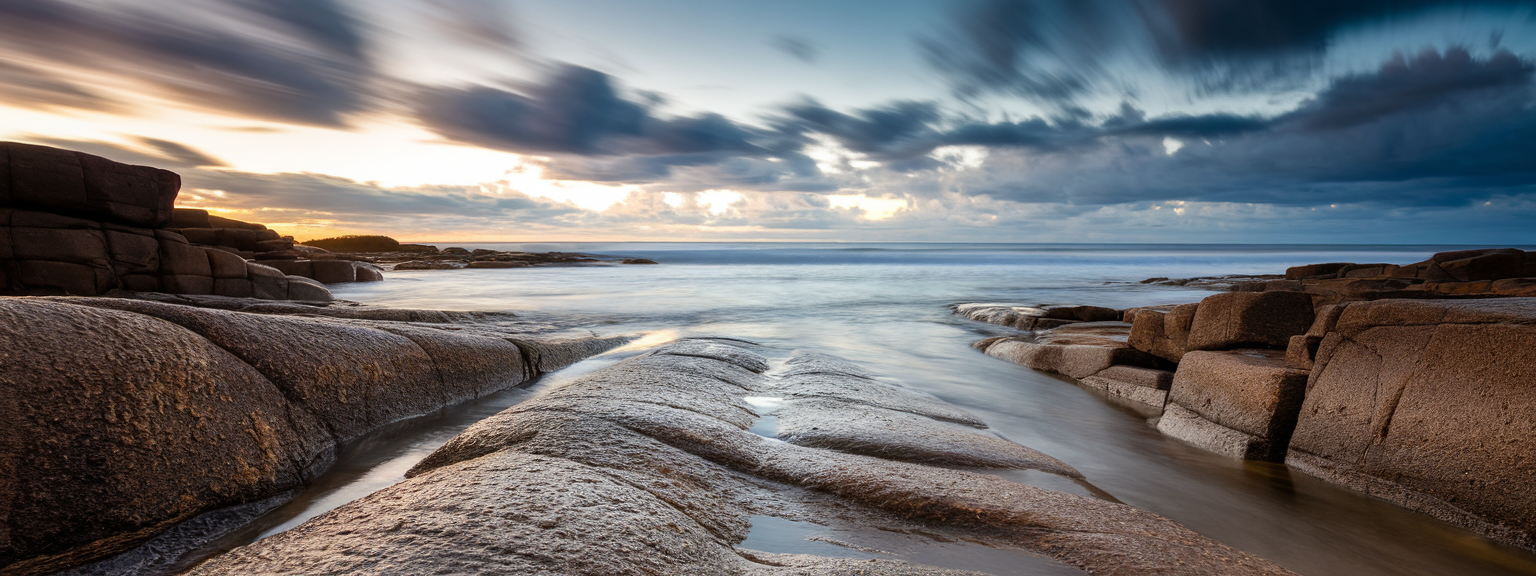
📸 Sample Scenario
Full walkthrough: Dramatic coastal landscape
Goal: Create a gallery-ready coastal image with silky water, dramatic sky, and strong foreground interest. First, plan with PhotoPills to find tide windows and golden hour timing. Next, arrive early and scout compositions while the light is soft. For capture, use a 16–35mm on a tripod and shoot RAW. Bracket three exposures at -2, 0, +2 EV for an HDR base. Also capture two focus-stack frames for full depth and a long-exposure (10–30s) with a 6-stop ND for water movement.
Post-processing steps
Import into Lightroom, cull images, and merge HDR exposures or export to Photoshop for exposure fusion. Align and auto-blend focus stack frames. If the sky needs replacement, use a separately exposed sky image and blend with luminosity masks. Then apply local dodge & burn to add texture and depth. For color grading, warm highlights and cool shadows (teal/orange) create cinematic contrast. Finally, sharpen for the target output and denoise where necessary. These steps will transform captures into stunning images suitable for prints and portfolios.
✅ Key Do’s for Effective Usage
Essential practices
- Do shoot RAW to maximize edit flexibility and dynamic range.
- Do bracket and plan exposure blending for high dynamic range scenes (HDR or manual fusion).
- Do use a tripod for focus stacking, long exposures, and panoramas.
- Do calibrate your monitor and use soft-proofing for print accuracy.
- Do backup RAW files and save high-resolution masters before destructive edits.
❌ Common Mistakes to Avoid
Typical issues and quick fixes
- Overcooked HDR: Prevent halos by using exposure fusion or manual blending with soft masks.
- Soft images from missed focus: Use focus peaking, live view magnification, and check at 100%.
- Blown highlights in skies: Bracket and blend or use graduated ND filters strategically.
- Banding after heavy grading: Work in 16-bit or ProPhoto where possible and add slight noise to dither tones.
🔄 Troubleshooting & FAQs
Q: My HDR images show ghosting when subjects moved between exposures. How do I fix that?
A: Use software with ghost reduction (Lightroom, Photoshop, Aurora HDR). Alternatively, select the sharpest moving frame as the reference or manually blend exposures in Photoshop using layer masks. If movement is excessive, consider exposure fusion with selective painting.
Q: Why do my long exposures have a magenta cast?
A: Long exposures can cause sensor heating and introduce color casts. Use a white balance reference frame, apply dark-frame subtraction, or correct in RAW using WB sliders and local adjustments. In addition, neutral density filters can introduce tint; test filters and correct per filter profile.
Q: How can I maintain sharpness across a wide landscape?
A: Use a lens sweet spot (f/8–f/11), focus one-third into the scene for hyperfocal technique, or use focus stacking. Also, ensure stable tripod support and mirror lock-up or electronic shutter to eliminate vibration.
Q: What are the best software tools for advanced image editing and HDR?
A: Lightroom and Photoshop remain industry standards. Capture One excels at color handling and tethering. For HDR, consider Aurora HDR or Photomatix in addition to native Lightroom/Photoshop tools. Use Topaz DeNoise and Sharpen AI for noise reduction and sharpening.
Q: What are the best AI tools for productivity in photography?
A: Use ChatGPT for ideation and captions, Notion AI for workflow management, and Luminar Neo for AI-based sky replacement and masking. These tools speed repetitive tasks while you focus on creative decisions.
Q: My skies are blown out but the foreground is fine. How do I balance them without HDR?
A: Use graduated ND filters during capture or apply selective masking in Lightroom/Photoshop to darken the sky. You can also overlay a separately exposed sky shot and blend with luminosity masks for natural transitions.
🖼️ Bringing It All Together
Final advanced workflow checklist
- Pre-shoot: visualize mood, scout, and prepare gear.
- Capture: shoot RAW, bracket, and use tripod for precision work.
- Post: cull, global correct, local adjust, HDR or exposure fusion, focus stack, and color grade.
- Archive: backup RAWs and export final assets in appropriate color spaces.
Ready to elevate your portfolio? Download our preset pack or checklist to streamline your next shoot and produce more stunning images.
Advanced techniques for stunning images require both technical accuracy and creative vision. By mastering pro composition techniques, lighting techniques, HDR workflows, and color grading, you will produce images that attract attention and hold quality under scrutiny. Practice deliberately, refine your post-processing with image editing tips, and document repeatable setups. Over time, this disciplined approach yields reliable, professional results suitable for galleries and clients.
![[Photographer editing a vibrant landscape on a monitor, demonstrating techniques for stunning images]](https://lenslesson.com/wp-content/uploads/2025/12/advanced-stunning-images-editing-workflow.png "[Stunning Images Editing Workflow]")
![[Photographer using a telephoto lens to capture a fast break at a basketball game — Sports Photography]](https://lenslesson.com/wp-content/uploads/2025/12/sports-photography-action-shot-telephoto-basketball.png "[sports-photography-action-shot]")
![[Photographer capturing sunrise landscape during a travel photography trip with a mirrorless camera]](https://lenslesson.com/wp-content/uploads/2025/12/travel-photography-sunrise-shot-essentials.png "[Travel photography sunrise capture]")
![[Close-up of a photographer adjusting camera settings - Photo Tips for sharper shots]](https://lenslesson.com/wp-content/uploads/2025/12/photo-tips-better-photos-smartphone-composition.png "[Photo Tips Sharper Shots]")
![[Photographer capturing a candid moment on a busy city sidewalk — street photography scene]](https://lenslesson.com/wp-content/uploads/2025/12/street-photography-candid-urban-moment.png "[Urban Street Photography Moment]")


