
Advanced Techniques to Create Stunning Images: Lighting, Composition & Editing
📝 Step-by-Step Guide: Stunning Images Workflow
Creating Stunning Images begins with a structured, repeatable workflow that links planning, capture, and advanced image editing. In this guide you will find practical steps for pre-shoot prep, camera settings, lighting strategies, capture techniques, and an efficient post-processing workflow. The word “Stunning Images” is our focus throughout; therefore each stage emphasizes lighting techniques, image composition, and advanced image editing for consistent results.
Pre-Shoot Planning: Concept, Gear, and Lighting Sketch
Define the concept and intended usage first. Decide mood, color palette, and final output (web, print, billboard). A clear concept reduces wasted time on set and helps with retouching choices in post.
- Build a mood board with reference images that show lighting position, color grading, and composition.
- Choose gear deliberately: sensor type, lens focal length, tripod, and lighting gear (strobes, speedlights, continuous LEDs).
- Sketch lighting diagrams for key, fill, rim, and background lights. Annotate modifier sizes and distances.
- Scout location for ambient light, power access, and background continuity.
Camera Settings, Metering, and Exposure Strategy
Start in manual mode for full control. Use base ISO for maximum dynamic range, choose aperture to control depth of field, and choose shutter speed to prevent motion blur. White balance should be set with a gray card for critical color, or set Kelvin manually when balancing strobe and ambient light.
- Aperture: f/1.4–f/2.8 to isolate subject; f/5.6–f/11 for landscapes.
- Shutter: reciprocal rule when handheld; sync speed for flash (or HSS when needed).
- Metering: spot for faces, matrix for scenes. Use a handheld meter for precise light ratios.
Lighting Techniques While Shooting
Position lights to sculpt form. Soft modifiers create smooth falloff and flattering skin tones. Grids and snoots create dramatic rim and accent lighting. Use light ratios to set contrast: 1:1 for flatter looks, 2:1–4:1 for natural modeling, and 8:1+ for high-contrast cinematic portraits.
Capture Strategies: Bracketing, Focus, and Movement
Bracket exposures when dynamic range exceeds the sensor. Use focus bracketing for macro and focus stacking in landscapes. For motion, use burst mode and choose shutter speed that retains crispness while preserving natural motion blur when desired.
Ingesting, Organizing, and Shortlisting
Copy RAW files to two locations immediately. Use consistent naming and embed metadata templates. Rate images quickly to create a shortlist for deeper edits. This step streamlines your advanced image editing work by focusing time on the best frames.
Post-Processing Workflow (Advanced Image Editing)
Work from global to local. Start with RAW development, then proceed to local corrections, retouching, color grading, and final output sizing. For example, use Lightroom or Camera Raw for global adjustments and Photoshop for frequency separation and precise dodge & burn. Additionally, integrate specialized tools like Capture One for color control or Topaz for denoise/sharpen tasks.
📌 Practical Applications: Stunning Images Use Cases
Portrait Photography
For portraits, prioritize controlled light and subject separation. Use rim lights to separate hair, and place key light to sculpt facial planes. In post, apply selective skin retouching using frequency separation and dodge & burn to maintain texture. Color grade to reinforce mood—warm highlights and cooler shadows often produce cinematic results.
Landscape Photography
Landscape work demands attention to hyperfocal distances, exposure blending, and graduated corrections for sky and foreground. Use exposure brackets, focus stacking, and graduated neutral density filters when necessary. In editing, blend brackets and apply localized clarity to enhance midtone definition without introducing halos.
Product & Commercial
Commercial images require consistent color and precise retouching. Use cross-polarization for reflective surfaces and capture multiple angles for e-commerce. Matching brand color standards is essential, so calibrate monitors and use color targets during capture.
Macro & Still Life
Macro requires small, hard lights for texture, plus diffusion to flatten specular highlights when needed. Use focus stacking to extend depth of field and remove dust in post. Advanced image editing techniques preserve fine detail while managing color tones.
Which of these use cases will you practice this week to improve your workflow and make more Stunning Images?
💡 Tips & Tricks: Stunning Images Mastery
These practical strategies speed efficiency and improve final image quality. Apply one new technique per shoot. For example, test luminosity masks on a landscape or try frequency separation on one portrait. Small changes accumulate into consistent improvements.
Workflow Shortcuts and Pro Habits
- Pre-visualize the final edit and shoot with the intended crop and color grade in mind.
- Use a modular lighting kit that fits most sessions: softbox, beauty dish, grid, and reflector.
- Batch process with camera profiles and presets to speed repetitive tasks.
- Calibrate monitors and use a color-managed workflow for reliable color reproduction.
Take action today: implement one preset and one lighting ratio change on your next shoot to test results immediately.
Advanced Color and Retouching Techniques
Use triadic or split-toning methods to craft moods. Employ luminosity masks for natural tonal control and frequency separation for skin. When dodging and burning, work on 50% gray layers set to Overlay or Soft Light to preserve nondestructive edits.
📸 Sample Scenario
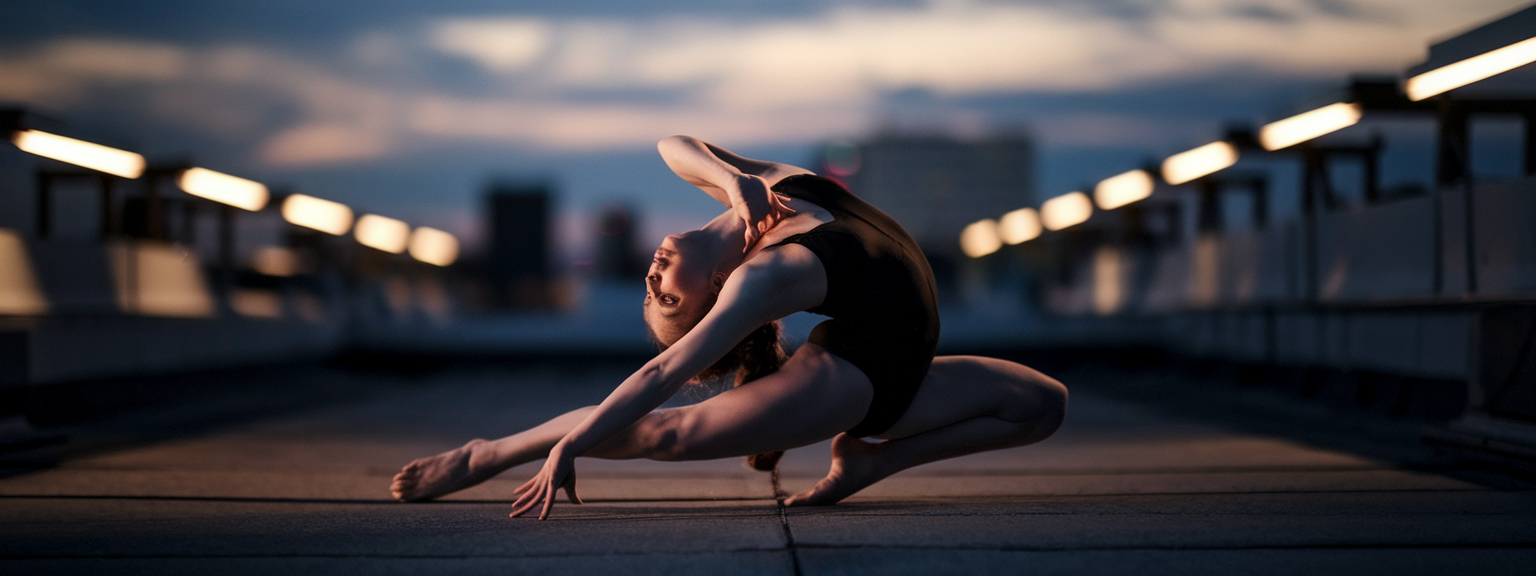
Sunset Editorial Portrait: Cinematic Rim Light
Scenario: An editorial portrait of a dancer on an urban rooftop at dusk. The goal is a cinematic, high-contrast look with rim light defining the silhouette. Start by building a moodboard that emphasizes warm highlights and cool shadows. Use a full-frame camera and an 85mm lens at f/2.8 to isolate the subject.
Setup and Capture
- Key: 60cm octabox camera-left at 45 degrees, slightly above head height, warmed with a half-CTO gel.
- Rim: Speedlight with a grid behind camera-right to separate hair.
- Camera: ISO 100, 1/200s, f/2.8, manual WB at 5200K. Meter for highlights on skin and preserve sky tone by underexposing ambient slightly.
- Capture variations and bracket by ±1 EV to secure sky detail.
Editing Sequence
Begin in Lightroom for baseline exposure, highlight recovery, and lens corrections. Use a radial dodge to brighten the face, and a gradient to darken unused corners. Next, open in Photoshop for frequency separation and precise dodge & burn to sculpt cheekbones. Finally, apply a split-tone grade (warm highlights, cool shadows), add a subtle S-curve for contrast, and export with appropriate sharpening and sRGB for web.
✅ Key Do’s for Effective Usage
Essential Practices
- Do pre-visualize and plan with moodboards to guide lighting and edits.
- Do shoot RAW for maximum flexibility in post-processing and advanced image editing.
- Do use light modifiers to control softness and falloff.
- Do keep edits nondestructive: use layers, masks, and save layered masters.
- Do back up RAW and PSD/TIFF masters and maintain consistent naming conventions.
❌ Common Mistakes to Avoid
Frequent Errors and How to Prevent Them
- Avoid over-retouching; preserve natural texture by keeping frequency separation subtle.
- Do not ignore the histogram; prevent clipping highlights and shadows while on set.
- Avoid unintentional mixed color temperatures; instead, gel lights intentionally or correct with localized white balance in post.
- Do not sharpen globally before resizing for web; apply final output sharpening after resizing.
- Avoid applying heavy clarity or structure on edges to prevent haloing; use luminosity masks to limit effect.
🔄 Troubleshooting & FAQs
Common Problems and Practical Fixes
Problem: Skin looks plasticky after retouching. Fix: Reduce the strength of the low-frequency blur in frequency separation and retain 30–50% of the original texture. Add texture back with a low-opacity high-pass or overlay of the original texture layer.
Problem: Blown highlights. Fix: Use exposure bracketing in-camera; in post, recover highlights with RAW sliders or blend bracketed exposures to preserve detail.
Problem: Mixed color casts. Fix: Use targeted HSL adjustments and local white balance tools. When reflections carry color, isolate with masks and correct per-surface.
Frequently Asked Questions (Voice-Search Optimized)
Q: What are the best techniques to create stunning images? A: Use intentional lighting techniques, strong composition rules, and precise post-processing. Start with correct camera settings, compose to lead the viewer’s eye, and employ advanced image editing methods like frequency separation and luminosity masks.
Q: How do I improve my image composition? A: Practice rule of thirds, leading lines, negative space, and layering. Move the camera and change focal lengths to explore perspective. Study master photographers and deconstruct their framing choices.
Q: What are the best advanced image editing tools? A: Adobe Lightroom and Photoshop are industry standards. Capture One excels at color control. Topaz Labs offers strong denoise and sharpening. Luminar and ON1 provide AI-assisted workflows for batch tasks.
Q: What is frequency separation and when should I use it? A: Frequency separation separates tone from texture to allow retouching without destroying detail. Use for skin smoothing, fabric corrections, and delicate texture work.
Q: How do I maintain consistent color across multiple images? A: Use camera profiles, shoot an X-Rite ColorChecker, and sync adjustments across images. Soft-proof and embed color profiles for the intended output (sRGB for web, Adobe RGB/ProPhoto for print).
Q: What are the best AI tools for photography productivity? A: Use Adobe Sensei features in Lightroom and Photoshop for assisted edits, Topaz Labs for AI denoise and sharpening, and Luminar Neo for AI-enabled enhancements. These tools increase throughput but require human oversight to maintain creative intent.
🖼️ Bringing It All Together
Producing Stunning Images is a synthesis of clear intent, disciplined lighting control, purposeful composition, and precise advanced image editing. Plan with a moodboard, control light with proper modifiers, and edit with non-destructive, repeatable workflows. Above all, iterate and evaluate so that each shoot refines your process.
Ready to elevate your work? Download the on-location lighting checklist and the Photoshop action pack from our resources page to start making more Stunning Images today.
Final checklist before delivery: archive RAW files, ensure color consistency across the set, preserve edit layers, and export with the correct size and color profile for the intended platform. Maintain discipline in maintenance and backups, and keep experimenting—apply one new lighting or editing technique per shoot to build a library of repeatable setups.
Alt text suggestions for SEO: “Portrait of a subject with cinematic rim light and warm grading — Stunning Images lighting techniques”; “Landscape at golden hour with exposure blend and advanced image editing”; “Product shot with cross-polarized lighting and high-end retouching for e-commerce”. Use these descriptions as image alt text to improve discoverability for keywords like Stunning Images, advanced image editing, photography techniques, and image composition.
Further reading and tools: consult “Light — Science & Magic” for lighting fundamentals, capture X-Rite ColorChecker charts for color accuracy, and explore Capture One for nuanced color control. Use Topaz Labs for targeted denoising and sharpening, and adopt luminosity masks for refined tonal control in high-contrast scenes.
Consistent application of these advanced techniques—lighting, composition, and advanced image editing—will raise your images from good to extraordinary. Keep the process systematic, document successful setups, and build presets or actions to scale quality across projects.
![[Person writing goals in a notebook to level up your skills]](https://lenslesson.com/wp-content/uploads/2026/01/level-up-your-skills-planning.png "[Level Up Your Skills Notebook]")


![[Person adjusting DSLR settings while learning — Beginner Camera Guide]](https://lenslesson.com/wp-content/uploads/2026/01/beginner-camera-guide-setup-dslr.png "[Beginner Camera Guide Setup]")
![[Creative entrepreneur brainstorming products on a laptop and notebook — turning passion into profit]](https://lenslesson.com/wp-content/uploads/2025/12/turning-passion-into-profit-guide-1.png "[Turning Passion Into Profit Strategy]")
![[Photographer capturing sunrise over coastal cliffs with camera — travel photography tips in practice]](https://lenslesson.com/wp-content/uploads/2025/12/travel-photography-tips-sunrise-cliffs-camera.png "[Travel Photography Tips Sunrise Shot]")