
Macro Photography Mastery: How to Capture Stunning Close-Up Shots
📝 Step-by-Step Guide: Macro Photography Techniques
Introduction and objectives
Macro photography reveals miniature worlds. In this guide you will learn practical workflows, gear selection, and shooting techniques for consistent close-up photography results. Use this manual whether you are shooting macro shots of insects, jewelry, or textures. In addition, the advice here applies to both outdoor nature work and controlled studio sessions.
Step 1 — Plan your shoot
Start by choosing a subject and setting realistic goals. For example, plan an insect study to capture eyes and hair, or a product shoot for jewelry detail. Scout locations, check weather, and pick time windows when light and wind are favorable. Early morning is often best because subjects are calmer and dew creates dramatic highlights.
Step 2 — Select essential gear
- Camera with manual controls — any DSLR or mirrorless will work for macro photography.
- True macro lens (1:1) — 100mm f/2.8 is versatile; 150–200mm macro lenses increase working distance.
- Sturdy tripod and a low-profile head for stability.
- Focusing rail for precise micro-adjustments during focus stacking.
- Lighting tools — ring flash, off-camera flash, diffusers, and reflectors.
- Accessories — extension tubes, bellows, reverse lens adapters for specialty high-magnification setups.
Step 3 — Camera settings and stabilization
Set the camera to Manual mode for reliable exposures. Begin with aperture f/5.6–f/8 to use the lens’s sharpest zone. If you need more depth of field, plan to stack and keep the aperture between f/5.6–f/11. Use the lowest ISO that lets you maintain shutter speed and image quality. For static subjects on a tripod, use remote release or camera timer to eliminate vibration. For moving subjects like insects, increase shutter speed — 1/200s or faster when using flash is common.
Step 4 — Composition and framing
- Fill the frame to emphasize texture and detail.
- Place focal points such as an insect’s eye on rule-of-thirds intersections.
- Experiment with background separation by controlling distance and aperture.
- Try different angles — low angles create an intimate perspective; top-down works on flat subjects.
Step 5 — Shooting strategies
When depth of field is insufficient, use focus stacking. Capture incremental frames from front to back using a focusing rail or careful manual changes. For dynamic subjects, use burst mode and anticipate movement. For consistent exposures, bracket and use ETTR (expose to the right) to reduce noise in shadows.
📌 Practical Applications: Macro Photography In Nature And Product Photography
Nature and wildlife uses
Macro photography is essential for insect identification, plant morphology studies, and documenting fine ecological details. Photographs of pollinators, for example, are valuable for citizen science and conservation initiatives. Moreover, extreme close-up images can reveal behaviors and structures that inform research.
Commercial and product applications
In commercial work, macro shots sell products. Jewelry, watches, and electronics benefit from detailed close-up photography. For e-commerce, clear macro images increase buyer confidence. Likewise, food photographers use macro photography to emphasize texture and freshness, for example, highlighting sugar crystals or crisp crust.
Scientific and educational contexts
Researchers and educators use macro images to document specimens and teach structure. Macro photography complements microscopy by providing field-scale detail with high resolution. Consequently, images produced with macro lenses become important assets for publications and presentations.
What subject will you photograph first using these macro photography techniques — a flower, an insect, or a product piece?
💡 Tips & Tricks: Macro Photography Lighting And Focus
Stabilization and vibration control
- Use a low-profile, sturdy tripod and a focusing rail for micro-adjustments.
- Employ mirror lock-up and electronic front-curtain shutter if available to reduce internal camera movement.
- When shooting handheld, enable image stabilization and support the camera with your body or a beanbag for low angles.
Maximizing depth of field
Depth of field is naturally shallow in macro photography. Therefore, focus stacking is the primary solution for extended depth while maintaining optical quality. Alternatively, increase your working distance and crop later to gain apparent depth. Use the lens’s sweet spot (often f/5.6–f/8) when stacking multiple frames to minimize diffraction.
Advanced lighting techniques
- Diffuse flash with a softbox or diffuser panel to create soft, even light.
- Use backlighting for rim light to separate subject edges from the background.
- Employ reflectors to fill shadows and add catchlights to insect eyes.
Try this: schedule a one-hour practice session focusing only on lighting setups — observe how small changes affect texture and contrast.
Macro lens and magnification tips
Invest in a true macro lens for sharpness and reliable 1:1 magnification. For skittish insects, select a longer focal length like 150–200mm to increase working distance. If budget is limited, use extension tubes or reverse-mount a lens to achieve higher magnification — but expect trade-offs in autofocus and convenience.
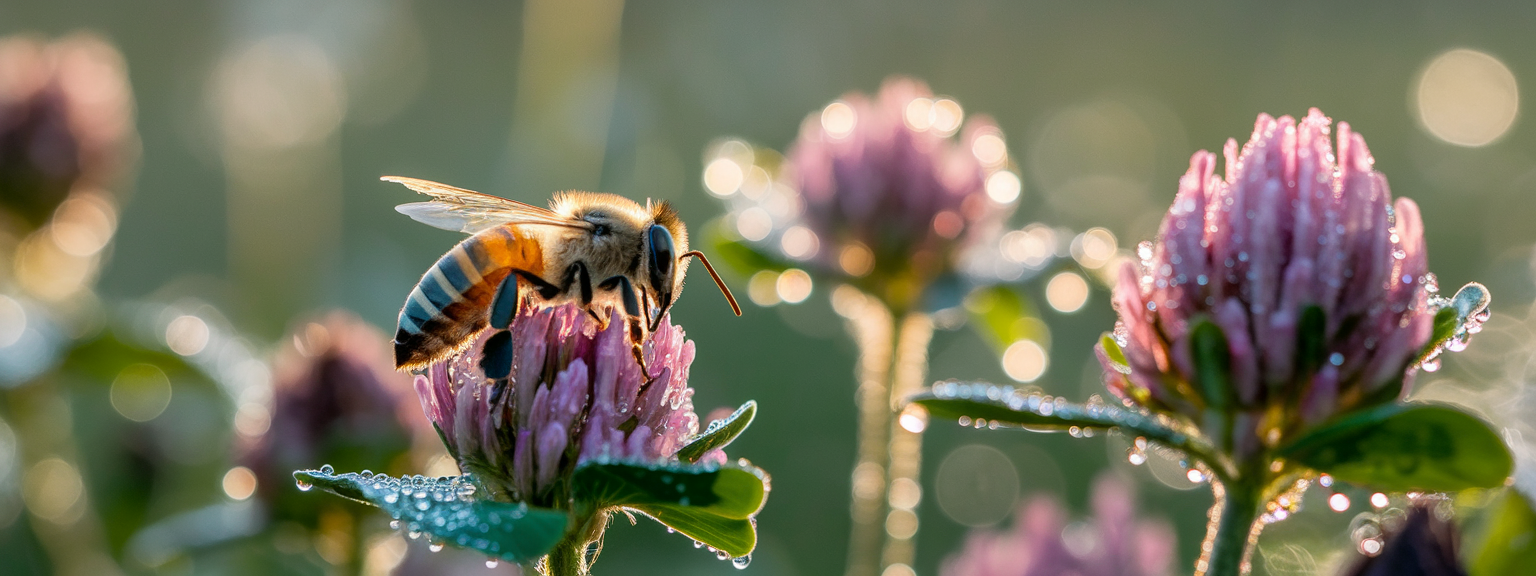
📸 Sample Scenario
Scenario overview
This sample scenario describes photographing a dew-covered honeybee feeding on clover at dawn. The goal is a crisp image showcasing head detail, pollen, and dew drops using focus stacking and controlled flash.
Equipment and preparation
- Full-frame mirrorless camera, 100mm f/2.8 macro lens
- Low-angle tripod, focusing rail, remote shutter
- Ring flash with diffuser; small silver reflector
- Extra batteries, memory cards, and a notebook to log conditions
Shooting workflow
- Arrive before sunrise and set the tripod low to the ground.
- Compose on a single clover blossom with clean background separation.
- Set camera to Manual: f/8, 1/200s (flash-sync), ISO 200; shoot RAW.
- Use live view and magnify to 200–400% for precise focus on the bee’s eye.
- Capture a sequence of 8–15 frames with small focus increments to cover the bee from eye to abdomen.
- Bracket exposures if background highlights risk clipping.
Post-processing summary
Import RAW frames, align and stack using Helicon Focus or Zerene Stacker, then retouch halos if necessary. Apply selective noise reduction and a slight clarity boost to emphasize hairs and pollen. Finally, export a high-resolution TIFF for print and a web-optimized JPEG with descriptive filename and alt text that includes macro photography and relevant keywords.
✅ Key Do’s for Effective Usage
Essential practices
- Do use a tripod or solid support for best clarity in macro photography.
- Do shoot in RAW and maintain low ISO for maximum detail retention.
- Do focus on the subject’s most important feature, usually the eye for insects.
- Do bracket focus and exposure for stacking and dynamic scenes.
- Do respect and protect wildlife — ethical behavior yields better images and preserves habitats.
- Do name files with descriptive keywords such as “macro photography honeybee dew clover” for SEO.
❌ Common Mistakes to Avoid
Frequent errors and fixes
- Mistake: Shooting handheld at very high magnification. Fix: Use a tripod or raise shutter speed and stabilize the subject.
- Mistake: Over-reliance on f/22 for depth of field without stacking. Fix: Use stacking or increase working distance and crop.
- Mistake: Poor lighting creating flat images. Fix: Add diffused flash or reflectors; bracket exposures when necessary.
- Mistake: Focusing on the wrong plane. Fix: Use live view magnification and focus peaking for critical planes.
- Mistake: Disturbing insects. Fix: Approach slowly, use longer focal lengths, and minimize direct flashes.
🔄 Troubleshooting & FAQs
Troubleshooting: blurry images
If an image is soft, first determine whether the cause is camera shake, focus error, subject movement, or diffraction. Use a tripod and remote release to remove camera shake. Use live view magnified to confirm focus. If f/22 causes softness, open to f/5.6–f/11 and stack images instead.
Troubleshooting: shallow depth of field
When depth is too shallow, use focus stacking, increase working distance, or reduce magnification. For stationary subjects, capture multiple frames and combine them in stacking software. For moving subjects, attempt to time your shots during calmer moments, such as early morning.
Troubleshooting: harsh highlights and shadows
Diffuse your light source and lower flash power. Add a reflector to fill shadows. If the background is too bright, underexpose slightly and recover in RAW or use exposure bracketing and blend later.
FAQs — voice-search friendly
Q: What is macro photography?
A: Macro photography is the practice of capturing extreme close-up images at life-size (1:1) or greater magnification to reveal details unseen by the naked eye.
Q: What gear do I need for macro shots?
A: A camera with manual controls, a true macro lens (1:1 recommended), a sturdy tripod, focusing aids, and lighting such as ring flashes or diffusers are the core items.
Q: How do I get more depth of field in close-up photography?
A: Use focus stacking, increase working distance and crop, or stop down aperture while managing diffraction. Stacking provides the best balance of depth and sharpness.
Q: What are the best macro lens tips for insect photography?
A: Use longer focal length macro lenses (100–200mm) to increase working distance, approach slowly, and shoot during cooler times when insects are less active. Use low-power diffused flash to add light without startling subjects.
Q: What is focus stacking and how do I do it?
A: Focus stacking involves taking multiple frames focused at incremental distances and combining them in software such as Helicon Focus or Zerene Stacker. Use a tripod and a focusing rail for precise increments.
Q: What are the best AI tools for productivity?
A: Popular productivity AI tools include Notion AI for workflow and notes, Grammarly for writing clarity, Jasper for copy generation, and Adobe Firefly for creative assets. Use these to accelerate editing and content tasks, but review outputs carefully for accuracy.
Q: Can I do macro photography with a smartphone?
A: Yes. Many smartphones offer macro modes and clip-on lenses. Use a tripod adapter and manual apps to control focus and exposure for better results.
🖼️ Bringing It All Together
Workflow checklist
- Decide subject, time of day, and shooting goals.
- Pack essential gear: camera, macro lens, tripod, focusing rail, flash, diffusers, batteries.
- Set manual exposure, use live view for critical focus, and bracket focus when needed.
- Stack focus frames for extended depth of field and retouch final images carefully.
- Export and optimize files for web and print; add descriptive filenames and alt text including macro photography keywords.
Ready to apply these macro photography techniques? Download the printable checklist and try a one-subject practice shoot this week.
Macro photography is a discipline that rewards patience and precision. Therefore, practice regularly, study the work of experts, and refine your lighting and stacking workflows. Over time, your macro shots will become more consistent and visually compelling. For targeted improvement, focus on lighting control and focus stacking; these two areas offer the greatest gains in image quality.
Keep experimenting with subjects and techniques. Macro photography can transform everyday objects into striking images. As a result, you will expand both technical skill and creative vision.
![[Photographer capturing sunrise over coastal cliffs with camera — travel photography tips in practice]](https://lenslesson.com/wp-content/uploads/2025/12/travel-photography-tips-sunrise-cliffs-camera.png "[Travel Photography Tips Sunrise Shot]")
![[Person taking an outdoor portrait demonstrating Quick Photo Tips]](https://lenslesson.com/wp-content/uploads/2025/12/quick-photo-tips-better-photos.png "[quick-photo-tips-outdoor-portrait]")
![[Photographer capturing candid subjects at a busy city crosswalk for street photography]](https://lenslesson.com/wp-content/uploads/2025/12/street-photography-candid-crosswalk-urban.png "[Street Photography Crosswalk]")
![[Photographer using high shutter speed to capture an athlete mid-jump in sharp action shots with a blurred background]](https://lenslesson.com/wp-content/uploads/2025/12/action-shots-pro-tips-freeze-motion.png "[Action Shots Athlete Mid-Jump]")

![[Flat-lay of must-have photography gear including camera, lenses, tripod, camera bag, and lighting accessories]](https://lenslesson.com/wp-content/uploads/2025/12/must-have-photography-gear-flatlay.png "[Must-Have Photography Gear Flatlay]")

