
Mastering Post-Processing Essentials: A Complete Guide for Photographers | Post-Processing Essentials
📝 Step-by-Step Guide: Post-Processing Essentials
Overview and workflow summary
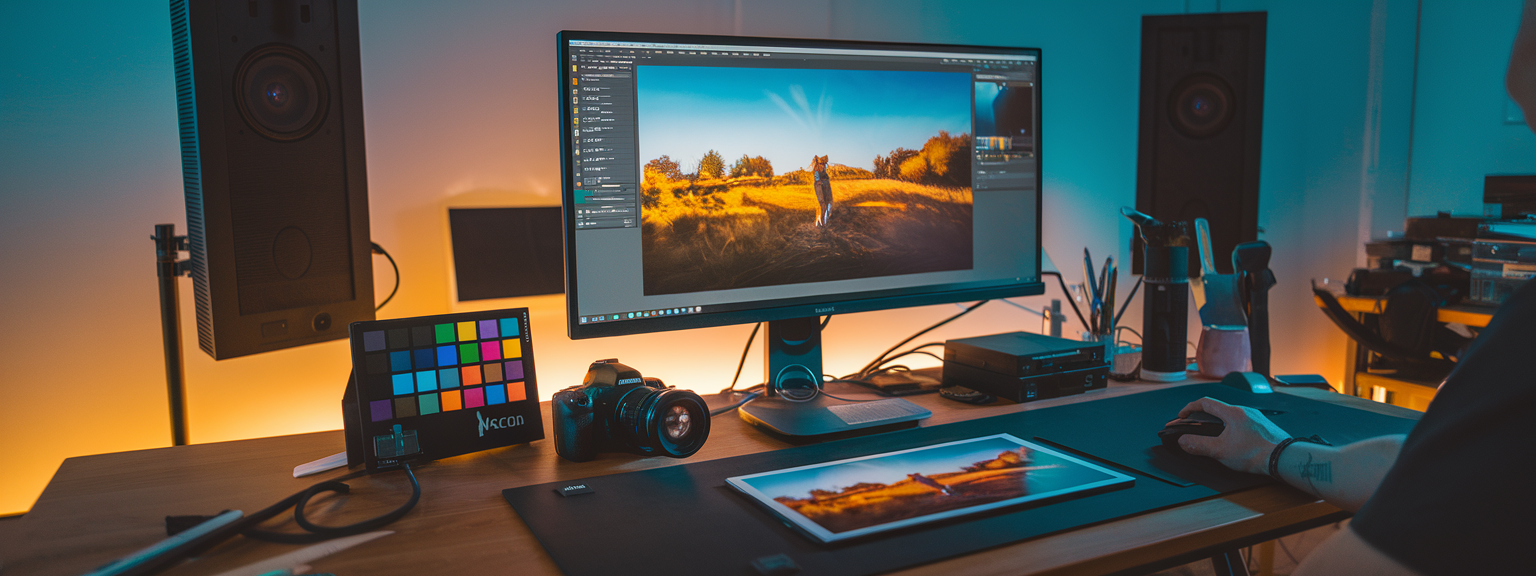
Post-Processing Essentials start with a reliable RAW workflow and end with deliverables that match client and platform requirements. In addition to exposure correction and retouching, the workflow integrates color grading, noise reduction, and output optimization. Therefore, this step-by-step section maps a chronological process that you can adopt into Lightroom, Photoshop, or DaVinci Resolve for video color grading.
1. Capture, import, and organization
Begin by shooting RAW to retain maximum tonal and color data. Calibrate your monitor before heavy edits. Use a consistent folder and naming convention (for example YYYY-MM-DD_Event_Subject). On import, apply lens corrections and a basic camera profile. Rate and flag images to accelerate culling. This initial structure streamlines every part of your Post-Processing Essentials workflow.
2. Base RAW adjustments (global)
Perform exposure correction first using the exposure, highlights, and shadows sliders. Next, correct white balance and set a neutral baseline. Use the tone curve for refined contrast control. For color work, prefer vibrance over saturation when protecting skin tones. As a result, you preserve natural tones while improving overall impact.
3. Local adjustments and masking
Use brushes, gradients, and AI-powered subject/sky masks to refine exposure and color locally. Apply dodge & burn to sculpt form. For portraits, use spot removal and frequency separation for refined retouching. In addition, combine luminosity masks and color range masks to protect specific tonal areas without global changes.
4. Color grading and creative looks
Use the HSL panel to tune specific hues, saturation, and luminance. Consider split toning or the Color Grading panel for cinematic separation between highlights, midtones, and shadows. Start conservatively, then push the grade for a distinct mood. If using LUTs, apply them on a separate layer or node and then adjust intensity to avoid clipping highlights.
5. Noise reduction and sharpening
Apply noise reduction before sharpening. Use luminance and color noise sliders and protect fine detail with the detail and contrast controls. For heavy noise, export to Topaz Photo AI or DxO PureRAW, and then reimport for final sharpening. Use masking to prevent sharpening in smooth areas like skies or skin.
6. Final checks and export
Soft-proof your files for print profiles and adjust shadows/highlights as needed. Embed metadata and copyright information. Export web images as JPEG, sRGB, long edge 2048–4096px, quality 70–85. For print, export TIFF or high-quality JPEG at 300 ppi in Adobe RGB or ProPhoto RGB. Archive RAW files to at least two separate storage locations.
Parallel: Video color grading essentials (DaVinci Resolve)
For video color grading, conform clips and perform base correction per shot using Lift/Gamma/Gain. Apply temporal noise reduction before heavy grading. Use node-based organization—separate base balance, secondary corrections, and creative grading into distinct nodes. Consider ACES for multi-camera consistency and render masters in DNxHR or ProRes before creating web proxies in h.264 or h.265.
📌 Practical Applications: Post-Processing Essentials
Portraits — natural skin and polished results
Portrait post-processing prioritizes skin tone accuracy, texture preservation, and eye detail. Use frequency separation to separate texture from color and apply targeted HSL adjustments to correct skin hue. Use local dodging to enhance catchlights and subtle sharpening on eyes and lips. For bridal or commercial portraits, maintain consistent color grading to match brand or event style.
Landscapes — maximizing dynamic range
Landscape edits often require HDR or exposure blending to retain highlight and shadow detail. Use graduated filters for skies, dehaze to recover distance contrast, and selective clarity for midground details. Color grading can enhance mood—cooler shadows and warmer highlights create cinematic depth. In addition, reduce green saturation when foliage distracts from the subject.
Commercial/product — accuracy and consistency
Commercial work demands precise color matching and spotless retouching. Use a color checker on set to build camera profiles and soft-proof against CMYK or print profiles. Remove dust and specular artifacts and provide multiple export sizes and color spaces (sRGB for web, specific CMYK for print).
Event and wedding — speed at scale
For events, use Lightroom presets and Auto-Sync to process large batches. Create smart previews to edit on laptops without the full RAW load. Flagging and rating accelerate selection, while virtual copies allow multiple stylistic variants for the same RAW file. Finally, archive all originals and final exports to redundant storage immediately after delivery.
Video — narrative-driven color grading
Video color grading should support story beats and continuity. Match shots using scopes, then apply secondary corrections for skin. Use tracker-based power windows to isolate subjects during tricky lighting changes. For a cohesive project, create LUTs inspired by your photography grades and apply them during the edit to ensure visual consistency across stills and motion.
Decide which area aligns with your current projects and practice the specific steps above. For example, practice frequency separation on three portrait files and perform a dedicated color grading pass for three landscape images to compare results across workflows.
💡 Tips & Tricks: Post-Processing Essentials
Lightroom efficiency tricks
Use virtual copies to create multiple looks from one RAW file. Build smart previews to edit offline and to speed up catalog performance. Create and organize preset collections by lighting type and shooting scenario. Use keyboard shortcuts and Auto-Sync to accelerate repetitive tasks. In addition, maintain a lookbook of favorite grades for quick reference.
Advanced retouching essentials
Frequency separation is an advanced but critical technique for professional retouching. Use non-destructive layers in Photoshop and avoid excessive smoothing. Instead, use dodge & burn to even out form and tone. For fast spot removal, use the Heal tool for small blemishes and the Patch tool for larger areas. Always compare with the original and work at 100% periodically to check detail.
Masking and selections
Combine subject/sky selectors with color and luminance range masks for precise control. Feather masks broadly to ensure natural transitions. For complex masks, use multiple layers and refine edges with the Refine Edge tools in Photoshop. As a result, local adjustments appear seamless and well-integrated.
Noise reduction and sharpening balance
Apply noise reduction before sharpening. For high ISO images, consider AI denoisers to retain texture while removing grain. When sharpening, use masking to protect skies and deep shadows. For output sharpening, match settings to the destination: screen, inkjet, or offset press.
LUTs and color grading workflow
Use LUTs as starting points. Always perform a base correction before applying LUTs to avoid clipping. Apply LUTs on separate nodes or layers and then add secondary corrections. For multi-camera projects, consider ACES to maintain consistent color across devices.
📸 Sample Scenario
Wedding day: 1,200 RAW photos to final album
This sample scenario demonstrates applying Post-Processing Essentials at scale. Start by creating an import preset in Lightroom with lens corrections and a camera profile. Cull efficiently with flags and star ratings. Apply a base preset for consistency across ceremony images, then refine hero images individually for retouching and frequency separation. Export high-res TIFFs for album design and deliver web JPEGs in sRGB. Archive original RAW files to two separate storage solutions immediately after delivery.
Highlight video workflow
Conform footage in DaVinci Resolve and perform primary balance per shot. Use temporal denoise for low-light reception footage and then apply creative grading to match still imagery. Render a graded 4K master and create web-ready h.264 proxies. As a result, stills and video maintain a coherent visual identity across the final delivery.
✅ Key Do’s for Effective Usage
Best practices checklist
- Do shoot RAW to maximize exposure correction and color grading flexibility.
- Do calibrate your monitor monthly and use consistent color spaces.
- Do apply noise reduction before sharpening.
- Do work non-destructively: use layers, smart objects, and virtual copies.
- Do soft-proof for print and test prints before final deliverables.
- Do maintain a lookbook of favorite grades and LUTs for consistent output.
❌ Common Mistakes to Avoid
Frequent errors and how to prevent them
Avoid over-saturation and excessive sharpening. Do not rely solely on presets; adapt them per image. Never skip monitor calibration or backups. Excessive noise reduction will remove detail, so apply it conservatively. Finally, always check your work with scopes to prevent clipping and color shifts.
🔄 Troubleshooting & FAQs
Common questions (voice-search friendly)
Q: My images look flat after editing — how can I fix them?
Add contrast with the tone curve and use local dodge & burn to sculpt midtones. Increase vibrance rather than saturation for subtle color boost. Check the histogram and adjust highlights or shadows to avoid clipping.
Q: How do I reduce noise without losing detail?
Use luminance noise reduction with careful detail and contrast balance. Apply noise reduction prior to sharpening. For challenging files, export to Topaz Photo AI or DxO PureRAW, then re-import and selectively sharpen.
Q: Why do my prints look different than my screen?
Likely causes are monitor calibration, color profile mismatch, or incorrect soft-proofing. Calibrate your monitor, soft-proof with the printer profile, and export using the printer’s recommended color space.
Q: How do I make skin look natural after retouching?
Use frequency separation to preserve texture while correcting tone. Apply light healing for small imperfections and dodge & burn to even tone. Keep adjustments subtle and compare before/after frequently.
Q: What file formats and compression settings should I use for web and print?
Web: JPEG, sRGB, quality 70–85, long edge 2048–4096px. Print: TIFF or max-quality JPEG, Adobe RGB or ProPhoto RGB, 300 ppi, minimal compression. Archive RAWs in original format for long-term preservation.
Q: What is the best order: noise reduction then sharpening or sharpening then noise reduction?
Apply noise reduction first, then sharpen. Noise reduction removes unwanted grain. Sharpening after noise reduction restores perceived detail without amplifying noise.
Q: What are the best AI tools for productivity?
Top AI tools include Topaz Photo AI and DxO PureRAW for denoising, Topaz Gigapixel for upscaling, Adobe Select Subject and Luminar Neo for masking, Photoshop Neural Filters for portrait refinements, and Neat Video or DaVinci Resolve Studio for video denoise. Use AI to accelerate repetitive tasks, however always validate results manually for artistic intent.
Q: How do I match colors between different cameras?
Use a color checker on set and build camera-specific profiles. Adjust white balance and use color matching tools in Resolve or Lightroom. For multi-camera projects, consider ACES to maintain consistent color across systems.
🖼️ Bringing It All Together
Standard templates and final checklist
Adopt a standard photo post-processing template: import and lens/camera profile > cull selects > global RAW adjustments > local adjustments > retouching > noise reduction and sharpening > color grading > soft-proofing > export > backup. For video, follow a Resolve template: set color management > conform timeline > noise reduction > primary balance > shot matching > secondary corrections > creative grade > render master.
Begin with one file and follow the template end-to-end. Keep a log of settings that work for specific cameras and lighting conditions. Over time, these minor refinements compound into consistently superior output. Post-Processing Essentials are a repeatable, trainable discipline—practice regularly and maintain organized presets and LUT libraries.
![[Wide mountain vista at golden hour for landscape photography]](https://lenslesson.com/wp-content/uploads/2025/11/landscape-photography-golden-hour-mountain-vista.png "[Golden Hour Landscape Photography]")
![[Person journaling at a sunlit desk to capture creative inspiration daily]](https://lenslesson.com/wp-content/uploads/2025/11/creative-inspiration-daily-journal.png "[Creative Inspiration Daily Journal]")
![[Creative entrepreneur at a desk with laptop and handmade products, illustrating how to turn passion into profit]](https://lenslesson.com/wp-content/uploads/2025/11/turn-passion-into-profit-entrepreneur.png "[Turn Passion Into Profit Workshop]")
![[Studio portrait with dramatic lighting and color grading to demonstrate stunning images]](https://lenslesson.com/wp-content/uploads/2025/11/advanced-stunning-images-lighting-composition-editing.png "[Stunning Images Lighting And Editing]")
![[Photographer framing a mountain sunrise to demonstrate travel photography tips]](https://lenslesson.com/wp-content/uploads/2025/11/travel-photography-tips-sunset-shot.png "[Travel Photography Tips Sunset Shot]")