
Mastering Stunning Image Techniques: Advanced Tips for Photographers
Photography is both an art and a science, requiring intentional vision, technical skill, and creativity. To consistently produce breathtaking photos, photographers must learn and refine stunning image techniques. By mastering elements such as composition rules, lighting setup, camera settings, and photo editing techniques, you can create images that not only capture the moment but also tell compelling visual stories. This detailed guide offers expert photography tips, creative photography insights, and practical workflows for developing professional-level images.
📝 Step-by-Step Guide: Stunning Image Techniques
Step 1: Define Your Visual Story
Every photograph should communicate intention. Before capturing an image, determine the narrative you want to tell. Whether it’s portraying emotion in a portrait, showcasing grandeur in a landscape, or emphasizing movement in street scenes, clarity of purpose guides all other decisions.
Step 2: Optimize Camera Settings
Configure your camera as deliberately as a painter selects brushes:
- ISO: Use the lowest setting to reduce digital noise.
- Aperture: Wide apertures for shallow depth (portraits), narrow apertures for landscapes with extended depth.
- Shutter Speed: Faster speeds to freeze motion; slower speeds to create artistic blur.
Step 3: Master Composition Rules
Composition creates structure and flow within your images. Some key guiding rules include:
- Rule of Thirds: Improve balance by placing subjects off-center.
- Leading Lines: Use natural or structural lines to guide the viewer’s eyes.
- Negative Space: Minimal surroundings can highlight the main subject.
Step 4: Lighting Setup is Everything
Lighting dictates mood and quality. Natural daylight during golden hour offers warmth and soft shadows. Artificial setups like softboxes or ring lights provide controlled environments for portraits and products. For creative expression, incorporate dramatic shadows or reflective surfaces.
Step 5: Image Enhancement Through Editing
Post-processing enhances your photographic vision. Editing should be subtle and intentional:
- Adjust exposure and white balance for accuracy.
- Apply local adjustments to highlight focal areas.
- Enhance textures with controlled sharpening and clarity sliders.
📌 Practical Applications: Stunning Image Techniques
Portrait Photography
Use wide apertures for background blur, catchlights to give vibrancy to the eyes, and controlled lighting setups to flatter skin tones. Pair these with light editing that enhances rather than alters natural features.
Landscape Photography
Incorporate foreground interest for scale and depth. Long exposures with neutral density filters can create silky water or dynamic skies, strengthening the storytelling aspect of the scene.
Street and Documentary Photography
Anticipation of decisive moments, combined with layered compositions of environment and subjects, creates authenticity. Make use of available light for natural drama.
Commercial Photography
Careful light diffusion eliminates distracting shadows, while composition emphasizes product features. Precision in editing ensures visual consistency for brands.
💡 Tips & Tricks: Stunning Image Techniques
- Always shoot in RAW format for maximum edit flexibility.
- Use bracketing to handle high contrast scenes and blend later.
- Improve depth by including strong foreground elements.
- Experiment with unusual perspectives to energize compositions.
- Master minimalist styles where simplicity amplifies focus.
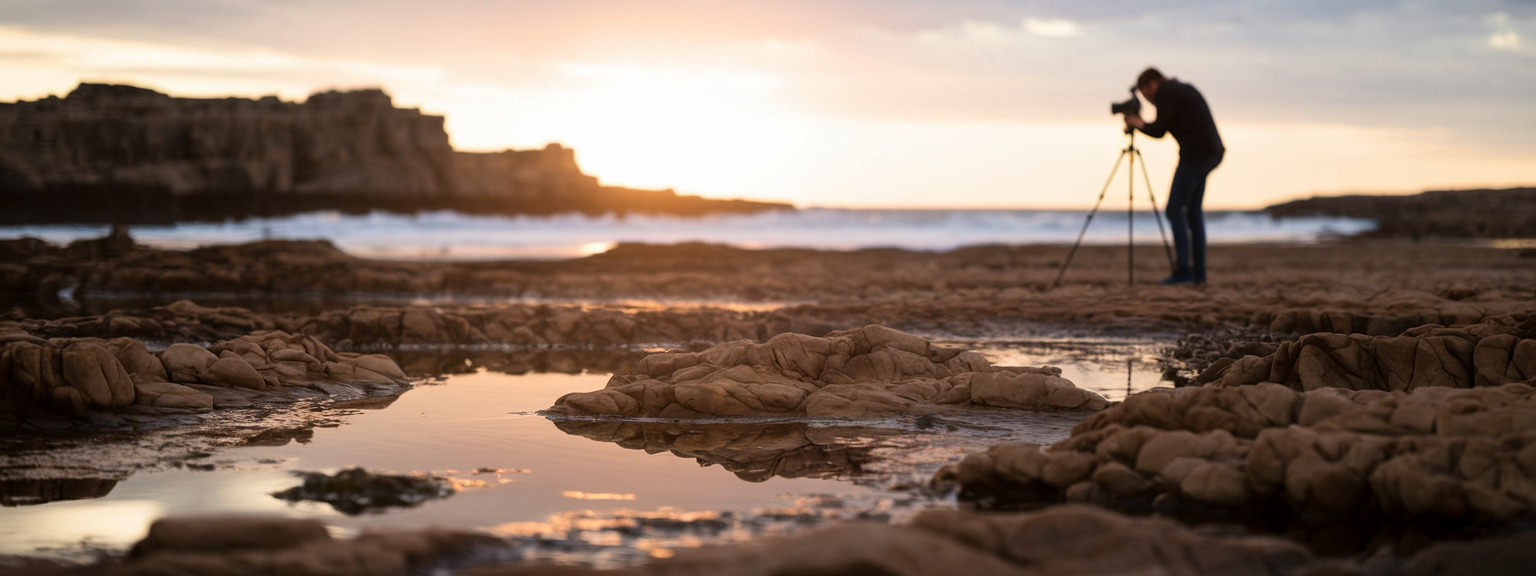
📸 Sample Scenario
Scenario: Capturing a Moody Seascape
Camera: ISO 100, aperture f/11, shutter speed 10 seconds with ND filter.
Composition: Foreground rocks guide the eye; horizon positioned by rule of thirds.
Lighting: Blue hour adds atmospheric depth.
Editing: Use local adjustments to clarify rocks, deepen contrast, and emphasize misty water textures.
Result: A dramatic yet calm seascape, enhanced with effective image enhancement techniques.
✅ Key Do’s for Effective Usage
- Visualize the story before composing.
- Experiment with angles for originality.
- Study and apply light direction for balanced images.
- Enhance photos subtly with editing. Avoid excess.
- Regularly print images for true quality assessment.
❌ Common Mistakes to Avoid
- Overuse of HDR or exaggerated filters.
- Neglecting distracting elements in backgrounds.
- Incorrect white balance leading to unrealistic tones.
- Restricting shots to eye-level views only.
- Assuming new gear alone guarantees quality results.
🔄 Troubleshooting & FAQs
Why are my photos not sharp even with professional equipment?
Causes may include camera shake, focusing errors, or using a wide aperture unnecessarily. Use a tripod, refine focusing techniques, and optimize aperture for sharpness.
How do I improve low-light photography?
Stabilize with a tripod, use wide apertures, lengthen shutter speeds, and cautiously raise ISO. Incorporate external lighting where possible.
Which editing software is recommended for professional results?
Popular software includes Adobe Lightroom, Photoshop, Capture One, and Luminar. Each offers different strengths in RAW processing and creative manipulation.
Can smartphone users apply these stunning image techniques?
Yes. With manual controls, RAW shooting, and advanced mobile editing apps, modern smartphones allow application of the same composition and lighting principles as DSLRs and mirrorless cameras.
🖼️ Bringing It All Together
Creating jaw-dropping photographs demands more than equipment; it requires deliberate application of stunning image techniques. By uniting refined camera settings, thoughtful composition rules, intentional lighting setups, and precise image enhancement, your photography will consistently leave impact. Every shot presents a new opportunity for refinement and storytelling.
Photography is a continuous journey of growth. When you apply advanced stunning image techniques paired with experimentation and consistent practice, your images will not simply document moments — they will transform into visual stories that inspire, move, and endure.
Visit our Photography Content Hub
Smart Resize by SmartLink Basics iPhone or iPad app
“`
![[Person at a desk planning a business with laptop and notes about turning passion into profit]](https://lenslesson.com/wp-content/uploads/2025/12/turning-passion-into-profit-guide.png "[Turning Passion Into Profit Plan]")
![[Beginner photographer adjusting camera settings while learning how to get started with camera]](https://lenslesson.com/wp-content/uploads/2025/12/getting-started-with-camera-beginner-setup.png "[Getting Started With Camera - Beginner Setup]")
![[Photographer editing a vibrant landscape on a monitor, demonstrating techniques for stunning images]](https://lenslesson.com/wp-content/uploads/2025/12/advanced-stunning-images-editing-workflow.png "[Stunning Images Editing Workflow]")
![[Photographer using a telephoto lens to capture a fast break at a basketball game — Sports Photography]](https://lenslesson.com/wp-content/uploads/2025/12/sports-photography-action-shot-telephoto-basketball.png "[sports-photography-action-shot]")
![[Photographer capturing sunrise landscape during a travel photography trip with a mirrorless camera]](https://lenslesson.com/wp-content/uploads/2025/12/travel-photography-sunrise-shot-essentials.png "[Travel photography sunrise capture]")
![[Close-up of a photographer adjusting camera settings - Photo Tips for sharper shots]](https://lenslesson.com/wp-content/uploads/2025/12/photo-tips-better-photos-smartphone-composition.png "[Photo Tips Sharper Shots]")
![[Photographer capturing a candid moment on a busy city sidewalk — street photography scene]](https://lenslesson.com/wp-content/uploads/2025/12/street-photography-candid-urban-moment.png "[Urban Street Photography Moment]")

